Butterfly主题介绍
官方文档 :Hexo Butterfly 主题官方文档
GitHub 仓库 :Hexo Butterfly 主题 GitHub 仓库
Hexo 官网上面有非常多好看的主题 ,你可以选择自己喜欢的主题下载下来放到 themes文件夹下面
比较好看的主题有 Butterfly 、Fluid 、Matery 、Kira 、Ayer 、Annie 。
Hexo Butterfly 主题是一个基于 Hexo 博客框架的优雅、简洁且功能丰富的主题。它受到了 Butterfly 主题的启发,提供了许多现代化的设计和功能,使得博客搭建和维护变得更加便捷和美观。以下是 Hexo Butterfly 主题的一些主要特点:
美观的设计 :Hexo Butterfly 主题采用了现代化的设计风格,提供了多种配色方案和布局选项,可以根据个人喜好进行定制。响应式设计 :主题支持响应式设计,可以在不同设备上(如桌面、平板和手机)提供良好的阅读体验。丰富的插件支持 :Hexo Butterfly 主题集成了许多实用的插件,如搜索功能、评论系统、标签云、归档页面等,方便用户快速搭建功能齐全的博客。SEO 优化 :主题内置了 SEO 优化功能,可以帮助博客在搜索引擎中获得更好的排名。多语言支持 :Hexo Butterfly 主题支持多语言,可以根据需要切换不同的语言显示。自定义配置 :主题提供了丰富的配置选项,用户可以通过修改配置文件来调整主题的外观和功能。社区支持 :Hexo Butterfly 主题拥有活跃的社区支持,用户可以在社区中获取帮助、分享经验和交流技巧。
基础配置 首先点击 官方下载地址 下载 master 分支的最新稳定版的代码,解压缩后,将 hexo-theme-matery 的文件夹复制到你 Hexo 的 themes 文件夹中即可。
当然你也可以使用 git clone 命令来下载,例如下载Butterfly 主题
1
2
$ cd blog $ git clone -b master https://github.com/jerryc127/hexo-theme-butterfly.git themes/butterfly
然后修改 Hexo 根目录下的 _config.yml 的 theme 的值:theme: butterfly
按照官方建议,为了减少升级主题后带来的不便,可以将主题配置复制到与主配置同级目录内
在 hexo 的根目录创建一个文件 _config.butterfly.yml,并把主题目录的 _config.yml 内容复制到 _config.butterfly.yml 去。( 注意: 复制的是主题的 _config.yml ,而不是 hexo 的 _config.yml)
注意: 不要把主题目录的 _config.yml 删掉
注意: 以后只需要在 _config.butterfly.yml 进行配置就行。_config.butterfly.yml, 配置主题的 _config.yml 将不会有效果。
Hexo会自动合併主题中的 _config.yml 和 _config.butterfly.yml 里的配置,如果存在同名配置,会使用 _config.butterfly.yml 的配置,其优先度较高。
网站背景 可以是网络地址,也可以是文件相对路径
1
2
# The banner image of home page index_img: /img/bg.jpg
一般情况下,source目录为资源文件根目录
效果如下
头像 修改 主题配置文件
1
2
3
avatar: img: /img/avatar.png effect: true
网站图标 1 favicon: /img/favicon.ico
导航栏设置 1 2 3 4 nav: logo: /img/avatar.png display_title: true fixed: false
目录
1 2 3 4 5 6 7 8 9 10 11 12 13 14 15 16 17 18 19 20 21 22 23 24 25 26 27 28 29 30 31 32 33 menu: 首页: / || fas fa-home 主页: https://www.shiguang666.eu.org/ || fas fa-id-card 文章||fas fa-book: 分类: /categories/ || fas fa-folder-open 标签: /tags/ || fas fa-tags 归档: /archives/ || fas fa-archive 导航||fas fa-paper-plane: 站内: /navigate/ || fas fa-sign-in 站外: https://nav.shiguang666.eu.org/ || fas fa-sign-out 实验室||fa-solid fa-flask: 每日早报: /news || fa fa-calendar 站点监控: https://kuma.shiguangdev.cn/dashboard || fa fa-check-circle Hexo管理面板: https://qexo.shiguang666.eu.org/ || fas fa-q lobe-chat: https://lobe.shiguang666.eu.org/ || fa fa-trophy chat-gpt-next-web: https://chatgpt.shiguang666.eu.org/ || fa fa-university Talk with Gemini: https://geminichat.shiguang666.eu.org/ || fa-regular fa-comment gemini-pro-chat: https://gemini.shiguang666.eu.org/ || fa fa-truck 在线小游戏: https://games.shiguang666.eu.org || fa-solid fa-dragon 怀旧游戏机: https://game.shiguang666.eu.org || fa-solid fa-headset 随机小姐姐: /xjj/ ||fa fa-rocket 高考倒计时1: https://countdown.shiguang666.eu.org/ || fa-solid fa-calendar-check 高考倒计时2: https://countdown1.shiguang666.eu.org/ || fa-solid fa-stopwatch-20 高考倒计时3: https://countdown2.shiguang666.eu.org/ || fa-solid fa-hourglass-start 友链||fa-solid fa-user-group: 本站友链: /flink/ || fa-solid fa-user-tie 随机开往: https://www.travellings.cn/go.html || fa fa-subway 异次元之旅: https://travel.moe/go.html?travel=on || fa fa-taxi 列表导航: https://zhblogs.ohyee.cc/ || fa fa-motorcycle 相册: /gallery/ || fas fa-solid fa-image 留言: /comment/ || fas fa-comments 关于: /about/ || fas fa-heart
社交图标
Butterfly支持 font-awesome v6 图标.
书写格式 图标名:url || 描述性文字 || color
1
2
3
social: fab fa-github: https://github.com/xxxxx || Github || "#hdhfbb" fas fa-envelope: mailto:[email protected] || Email || "#000000"
图标名可在这寻找
配置文章链接转数字或字母
hexo-abbrlink
1 $ npm install hexo-abbrlink --save
在 _config.yml文件中进行配置:
1
2
3
permalink: posts/:abbrlink/ permalink: posts/:abbrlink.html
新增以下配置
1 2 3 4 5 6 7 8 9 10 11 12 13 14 abbrlink: alg: crc32 rep: hex drafts: false auto_category: enable: true depth: over_write: false auto_title: false auto_date: false force: false
设置关于页、分类页、标签页 butterfly 主题默认带有不少菜单,如关于(about)、分类(categories)、标签(tags)等,默认处于注释状态,将需要取消的菜单注释掉,然后生成相应的 page 即可。
打开 ~\themes\butterfly\_config.yml 文件,找到 menu 相关的设置,取消掉需要的菜单项的注释。重新生成部署后,可以看到新增的菜单项
但是单击后会报如下错误
1
2
3
Cannot GET /about/ Cannot GET /tags/ Cannot GET /categories/
这是因为还需要运行如下命令新建相关 page
1
2
3
hexo new page "about" hexo new page "tags" hexo new page "categories"
新建 page 后,会在 source 目录下新建 about、tags、categories文件夹,每个文件夹下还会创建一个index.md文件表示关于、标签页分类页面,编辑这三个MarkDown文件可以自定义这三个页面的内容.
最后一步,编辑各页面对应的index.md文件,增加 type 即可。注意冒号 : 后必须空一格,title 和 date 是默认生成的。重新部署后能够看到效果。
1
2
3
4
5
6
7
8
9
10
11
12
13
14
15
16
17
--- title: about date: 2021-03-13 15:21:30 type: "about" --- --- title: tages date: 2021-03-13 15:21:30 type: "tags" --- --- title: categories date: 2021-03-13 15:21:30 type: "categories" ---
在新建博文的头部,直接输入该博文的分类、标签等即可。分类只能有一个,标签能有多个,多个标签不能一行,注意下面的格式。
1
2
3
4
5
6
7
8
9
10
11
12
13
--- title: Hello World date: 2019 /3/26 hh:mm:ss categories: - 分类 tags: - PS3 - Games --- 摘要 <!--more--> 正文
设置好后重启生效,效果如下:
可以根据需要更改目录显示名和页面titile更改标题
效果如下
flink
4.1.0 支持
可在任何界面插入类似友情链接列表效果
内容格式与友情链接界面一样,支持 yml 格式
1
2
3
{% flink %} xxxxxx {% endflink %}
例如:
1
2
3
4
5
6
7
8
9
10
11
12
13
14
15
16
17
18
19
20
21
22
23
24
25
26
27
28
29
30
{% flink %} - class_name: 友情链接 class_ desc: 那些人,那些事 link_list: - name: 時光 link: https://blog.shiguang666.eu.org avatar: https://blog.shiguang666.eu.org/img/avatar.png descr: 心寄朗朗乾坤,胸怀真修之道。 - name: Hexo link: https://hexo.io/zh-tw/ avatar: https://d33wubrfki0l68.cloudfront.net/6657ba50e702d84afb32fe846bed54fba1a77add/827ae/logo.svg descr: 快速、简单且强大的网志框架 - class_ name: 网站 class_desc: 值得推荐的网站 link_ list: - name: Youtube link: https://www.youtube.com/ avatar: https://i.loli.net/2020/05/14/9ZkGg8v3azHJfM1.png descr: 视频网站 - name: Weibo link: https://www.weibo.com/ avatar: https://i.loli.net/2020/05/14/TLJBum386vcnI1P.png descr: 中国最大社交分享平台 - name: Twitter link: https://twitter.com/ avatar: https://i.loli.net/2020/05/14/5VyHPQqR6LWF39a.png descr: 社交分享平台 {% endflink %}
效果如下:
相册
可参考 Hexo添加相册
在主题配置里添加相册目录
在 blog\source目录下新建一个目录用于存放相册文件,例如 gallery
在其子目录下新建 index.html 或者 index.md文件
写法如下
1 2 3 4 5 <div class ="gallery-group-main" > {% galleryGroup name description link img-url %} {% galleryGroup name description link img-url %} {% galleryGroup name description link img-url %} </div >
name:图库名字
description:图库描述
link:连接到对应相册的地址
img-url:图库封面的地址
例如:
1 2 3 <div class ="gallery-group-main" > {% galleryGroup '壁纸' '收藏的一些壁纸' '/gallery/wallpaper' https://img.shiguangdev.cn/i/2024/10/17/6710c3f425e8c.jpeg %} </div >
name
description
name
description
name
description
新建一个.md文件用于存放预览的图片,文件名称与目录中引用的路径名称一致,例如 wallpaper.md
引入需要预览的图片,格式如下:
1
2
3
{% gallery [lazyload],[rowHeight],[limit] %} markdown 图片格式 {% endgallery %}
说明:
参数
解释
lazyload
【可选】点击按钮加载更多图片,填写 true/false。默认为 false。
rowHeight
【可选】图片显示的高度,如果需要一行显示更多的图片,可设置更小的数字。默认为 220。
limit
【可选】每次加载多少张照片。默认为 10。
其他示例:
1
2
3
4
5
6
7
8
9
10
11
{% gallery %} markdown 图片格式 {% endgallery %} {% gallery true,220,10 %} markdown 图片格式 {% endgallery %} {% gallery true,,10 %} markdown 图片格式 {% endgallery %}
如下:
重新执行 hexo g 生成网页文件,即可预览
相册也可在其他文章中引用
展示效果如下
评论
其他配置可参考
Hexo基于LeanCloud搭建评论功能
Hexo基于Gitalk搭建评论功能
Twikoo文档
开启双评论
最多支持两种评论系统
开启双评论后如下所示
设置文章隐藏评论
某些文章我们不希望显示评论,例如标签页,只需在文章源信息上添加 comments: false 即可
系列文章 在页面上显示系列文章
修改 主题配置文件
1 2 3 4 5 6 series: enable: true orderBy: 'title' order: 1 number: true
在文章的 front-matter 上添加参数 series,并给与一个标识
使用此标签外挂,会把相同标识的文章以列表的形式展示
写法:
1
2
{% series %} {% series [series name] %}
如果不写 series 标识,则默认为你使用此标签外挂所在的文章的 series 标识
3.0以上适用
使用方法:
1
2
3
4
5
6
7
8
9
10
11
12
13
14
15
16
{% btn [url],[text],[icon],[color] [style] [layout] [position] [size] %} [url] : 链接 [text] : 按钮文字 [icon] : [可选] 图标 [color] : [可选] 按钮背景颜色(默认style时) 按钮字体和边框颜色(outline时) default/blue/pink /red/purple/orange/green [style] : [可选] 按钮样式默认实心 outline/留空 [layout] : [可选] 按钮布局默认为line block/留空 [position] : [可选] 按钮位置前提是设置了layout为block 默认为左边 center/right/留空 [size] : [可选] 按钮大小 larger/留空
例如:
1
2
3
4
5
This is my blog, click the button {% btn 'https://blog.shiguang666.eu.org/',Butterfly %} This is my blog, click the button {% btn 'https://blog.shiguang666.eu.org/' ,Butterfly,far fa-hand-point-right %} This is my blog, click the button {% btn 'https://blog.shiguang666.eu.org/',Butterfly,,outline %} This is my blog, click the button {% btn 'https://blog.shiguang666.eu.org/',Butterfly,far fa-hand-point-right,outline %} This is my blog, click the button {% btn 'https://blog.shiguang666.eu.org/',Butterfly,far fa-hand-point-right,larger %}
This is my blog, click the button Butterfly Butterfly Butterfly Butterfly Butterfly
1
2
3
{% btn 'https://butterfly.js.org/',Butterfly,far fa-hand-point-right,block %} {% btn 'https://butterfly.js.org/',Butterfly,far fa -hand-point-right,block center larger %} {% btn 'https://butterfly.js.org/',Butterfly,far fa-hand-point-right,block right outline larger %}
Butterfly Butterfly Butterfly more than one button in center
1
2
3
4
5
6
7
{% btn 'https://butterfly.js.org/',Butterfly,far fa-hand-point-right,larger %} {% btn 'https://butterfly.js.org/',Butterfly,far fa -hand-point-right,blue larger %} {% btn 'https://butterfly.js.org/',Butterfly,far fa-hand-point-right,pink larger %} {% btn 'https:// butterfly.js.org/',Butterfly,far fa-hand-point-right,red larger %} {% btn 'https://butterfly.js.org/',Butterfly,far fa-hand-point-right, purple larger %} {% btn 'https://butterfly.js.org/',Butterfly,far fa-hand-point-right,orange larger %} {% btn 'https://butterfly.js.org/' ,Butterfly,far fa-hand-point-right,green larger %}
Butterfly Butterfly Butterfly Butterfly Butterfly Butterfly Butterfly 侧边栏 关闭侧边栏 文章添加 Front-Matter 配置
插件 本地搜索
GitHub仓库:hexo-generator-search
1 $ npm install hexo-generator-search --save
在 _config.yml文件中进行配置:
1 2 3 4 5 search: path: search.xml field: all content: true
主题的配置文件也需修改,此处仍以Butterfly 主题为例,修改 _config.butterfly.yml配置信息
1 2 3 local_search: enable: true
Aplayer 音乐播放器
GitHub仓库:hexo-tag-aplayer
安装插件
1 npm install hexo-tag-aplayer --save
修改主题配置文件:
1
2
3
aplayerInject: enable: false per_page: true
1 2 3 4 5 6 7 8 9 10 inject: head: bottom: - <div class="aplayer no -destroy" data-id="10051718332" data-server="netease" data-type="playlist" data-order="list" data-fixed="true" data-preload="auto" data-autoplay="false" data-mutex="true" ></div>
修改以下参数配置自己喜欢的歌单
id
必须值 歌曲 id / 播放列表 id / 相册 id / 搜索关键字
server
必须值 音乐平台: netease(即网易), tencent, kugou, xiami, baidu
type
必须值 song, playlist, album, search, artist
以网易云为例,登录网易云网页版,找到自己的歌单,可以在浏览器地址栏查看歌单播放列表id
每日早报
GitHub仓库: hexo-daily-news
介绍文章:Hexo 博客每天自动生成每日早报文章
从 ALapi 获取token
安装插件:
1 npm install hexo-daily-news --save
修改 _config.yml
1
2
3
4
hexo-daily-news: enable: true apiUrl: 'https://v2.alapi.cn/api/zaobao' token: 'your-api-token'
百度主动推流 1 npm install hexo-baidu-url-submit --save
1
2
deploy: - type: baidu_url_submitter
sitemap 1 2 npm install hexo-generator-sitemap --save npm install hexo-generator-baidu-sitemap --save-dev
在 _config.yml文件中进行配置:
1 2 3 4 5 6 7 8 9 10 sitemap: path: sitemap.xml rel: false tags: true categories: true baidusitemap: path: baidusitemap.xml
可参考文章 Hexo 博客添加 RSS 订阅功能
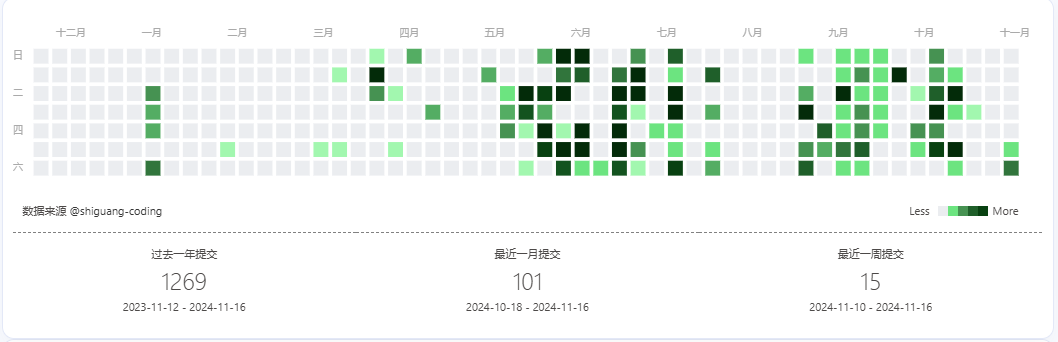
Gitee / GitHub贡献日历 可参考文章:Hexo Butterfly 主题在主页添加 GitHub 贡献日历
文章加密 可参考文章: hexo 文章加密
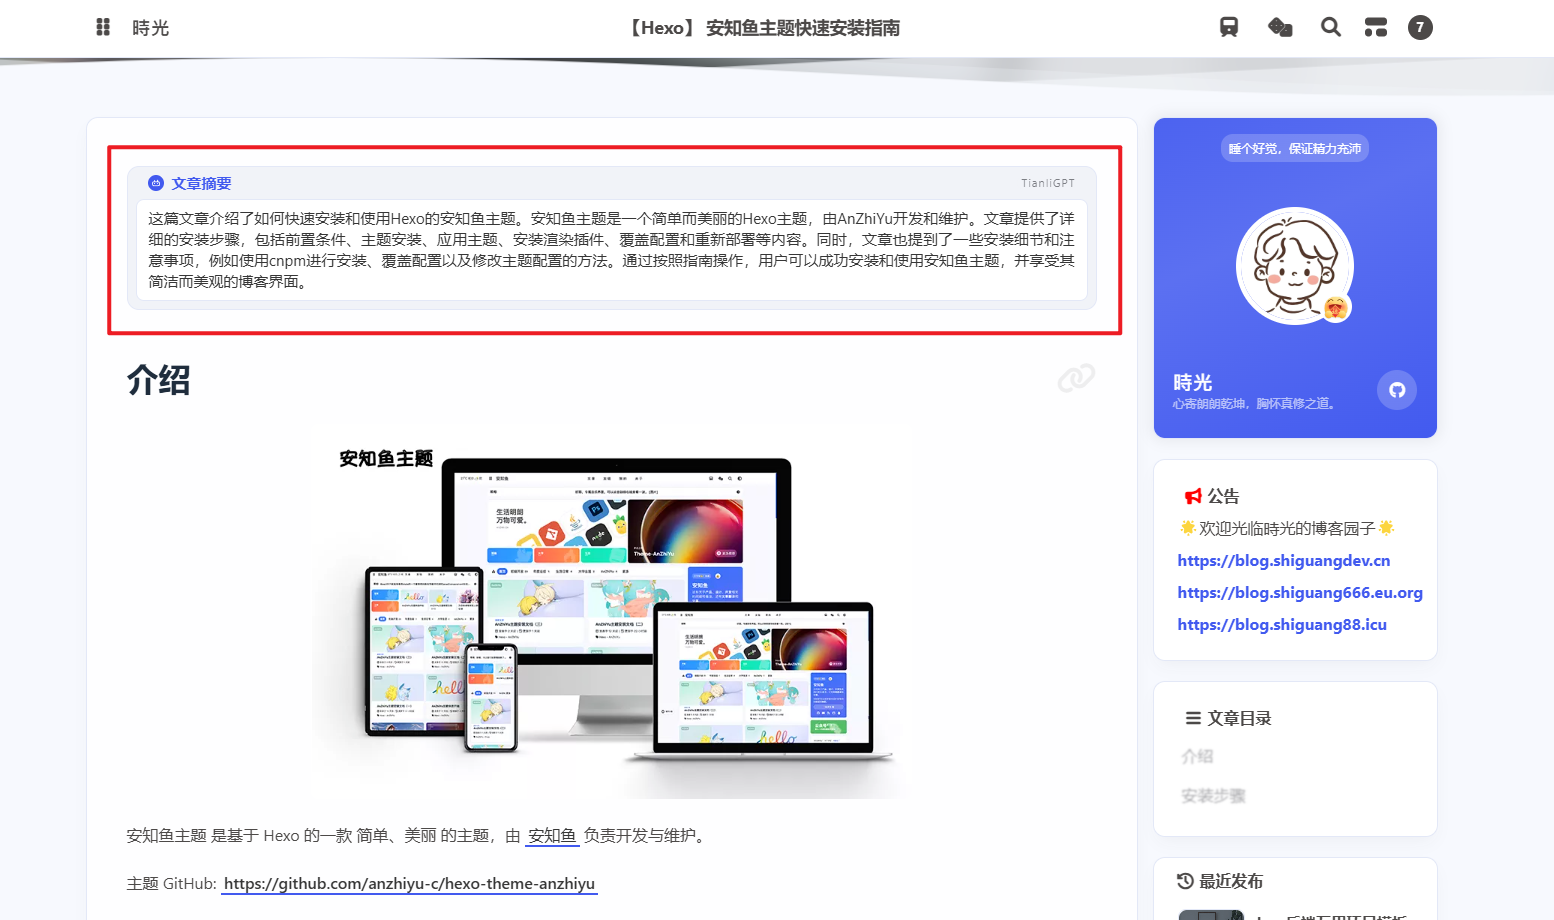
AI 摘要 可参考文章:Hexo 博客自动生成 AI 摘要
参考
Butterfly
使用Hexo免费搭建个人博客教程