【智能面试刷题平台】第四期:前端开发

【智能面试刷题平台】第四期:前端开发
時光本节重点
前端页面开发,跑通前后端核心业务流程,主要包括:
- 基础页面开发
- 用户模块
- 题库管理页面
- 题目管理页面
- 核心页面开发
- 主页
- 题库列表页
- 题目搜索页
- 题库详情页
- 题目详情页
- 题目题库绑定(管理员)
- 按照题库查询题目
- 修改题目所属题库
准备工作
在本章开始之前,可以先准备一些示例数据,便于前端开发时查看效果。
1 | -- 初始数据 |
如果需要更多图标,可以在 IconFont 获取。
一、基础页面开发
用户模块
各项目通用
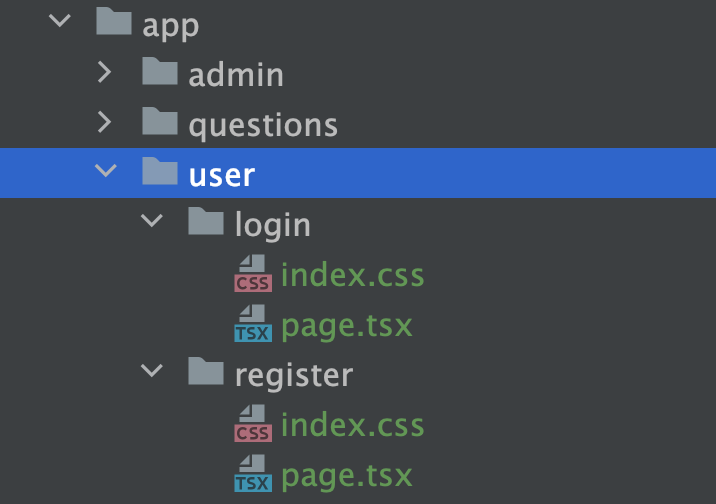
在 app 下新建用户相关页面的目录,Next.js 会自动映射成路由:
- 用户登录页:/user/login
- 用户注册页:/user/register
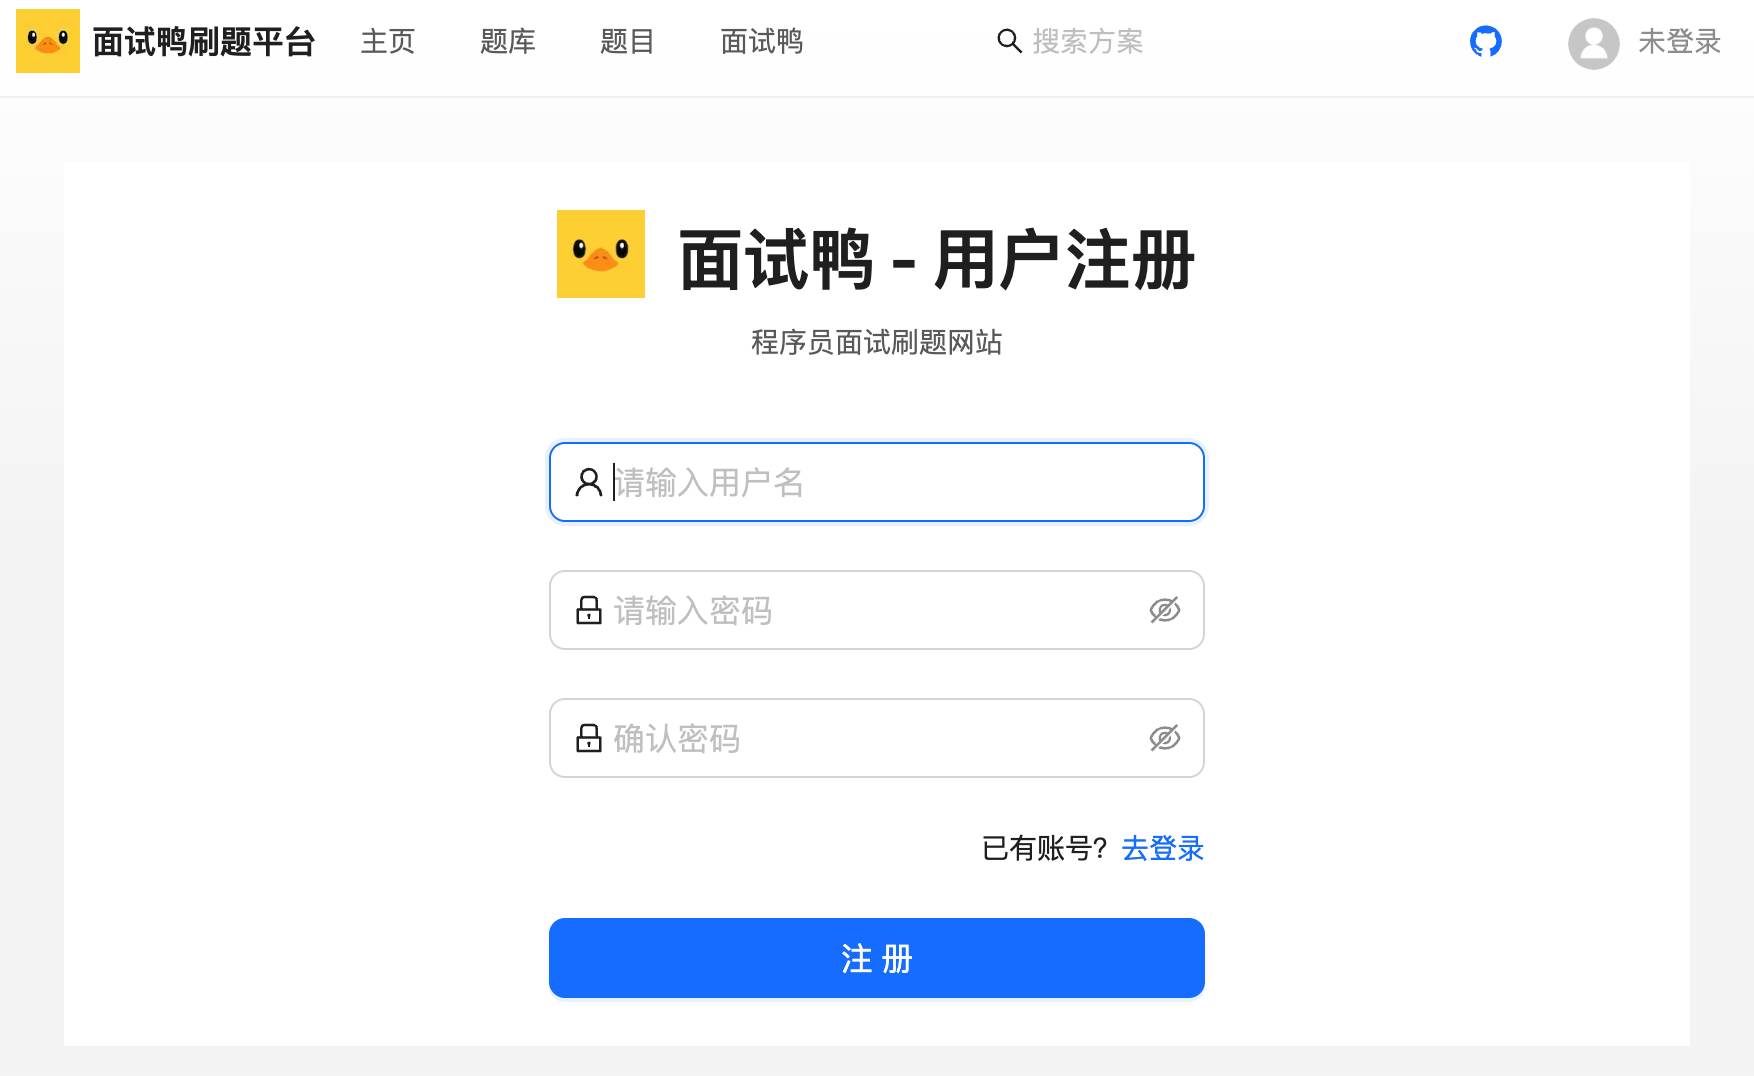
1、用户登录页面
该页面没有展示类内容,不需要 SEO,而且以动态交互(输入表单)为主,所以使用客户端渲染,跟开发传统的 React 项目一样。
可以使用 Ant Design ProComponents 的 ProForm 表单组件,先安装:
1 | npm i @ant-design/pro-form |
安装失败的话使用:
1 | npm i @ant-design/pro-form --force |
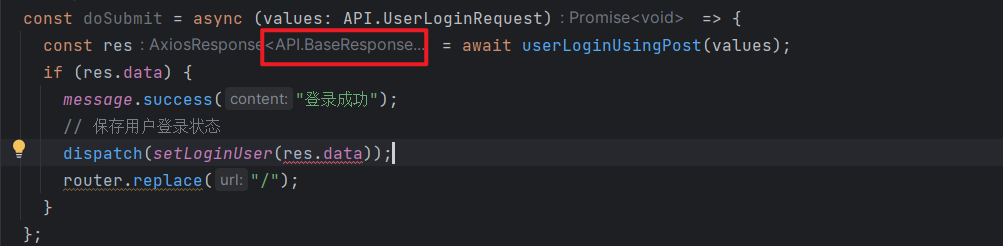
页面代码如下:
1 | "use client"; |
上述代码中,当用户登录成功后,会将信息存放到全局状态管理中。
如果遇到输入参数类型不匹配错误,可以忽略,不影响执行
打印异常错误时如遇到如下错误
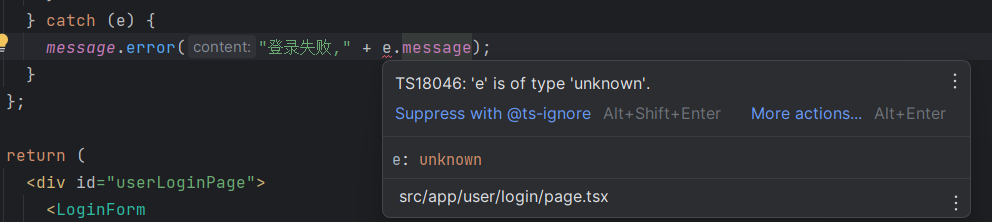
可调整为
1 | message.error("登录失败," + (e as Error).message); |
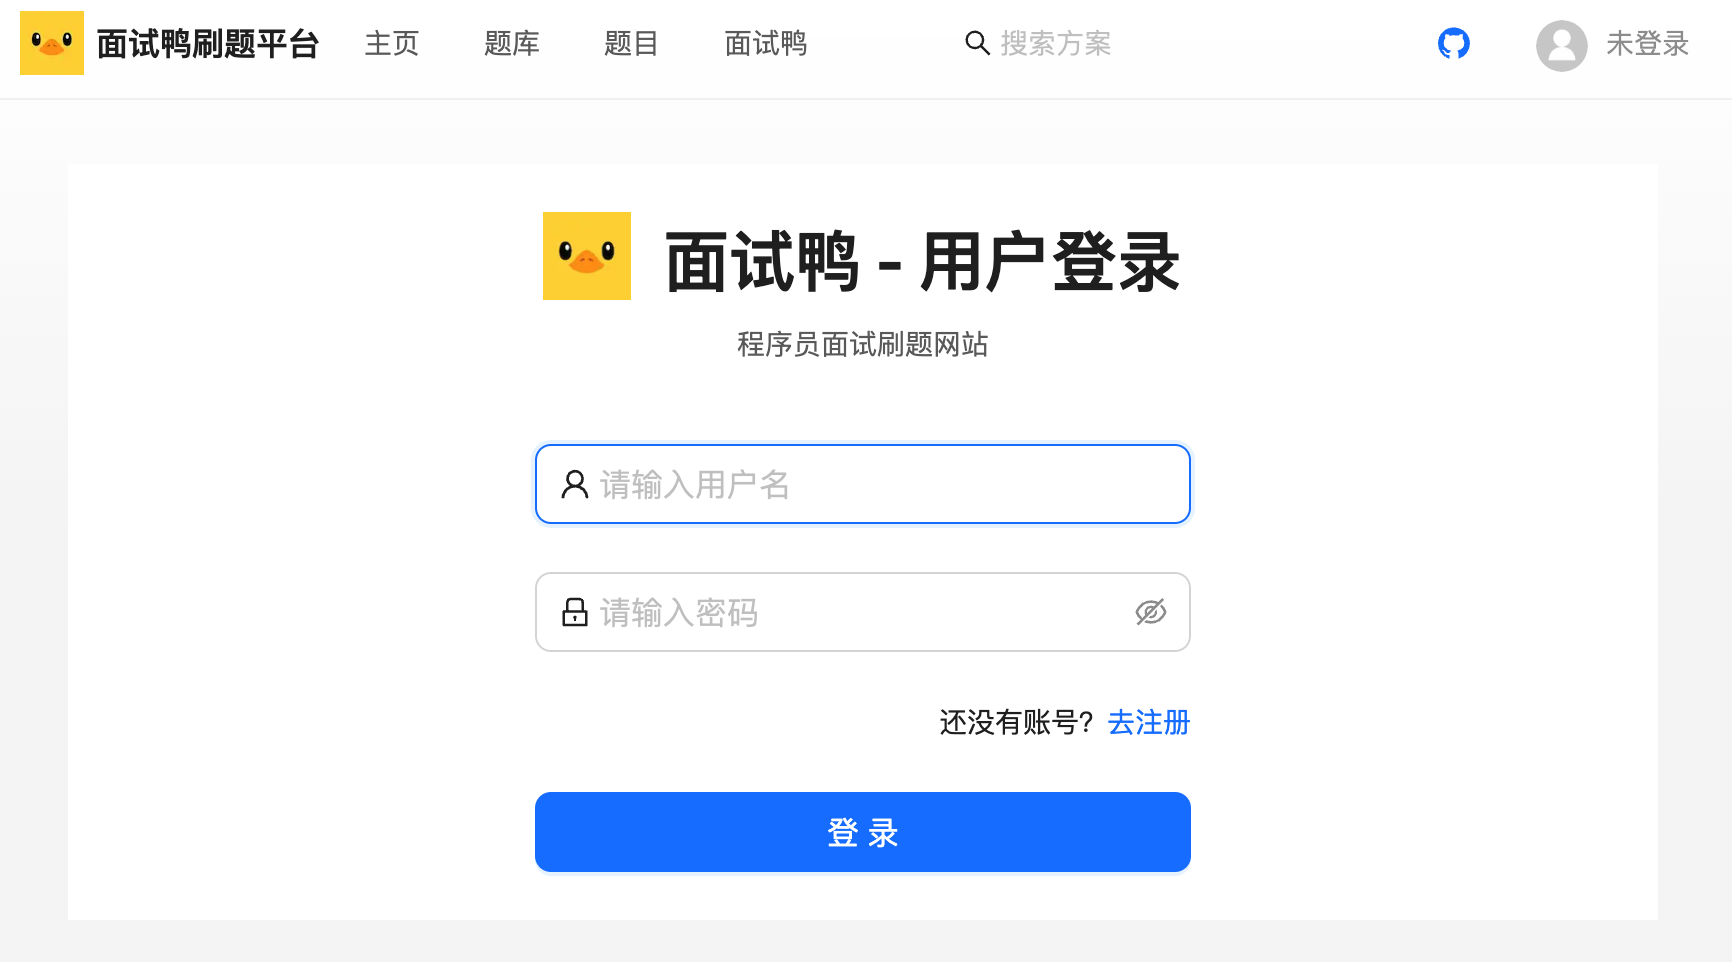
效果如图:
我们每次应用初始化(页面刷新)时,都需要调用后端获取当前登录用户信息,并且注意更新全局用户状态。
确保 InitLayout 的代码如下:
1 | // 初始化全局用户状态 |
点击右上角导航栏的 “未登录” 时,应该要自动跳转到登录页。修改 BasicLayout 如下,根据用户 id 区分用户是否登录,展示出不同的内容:
1 | const loginUser = useSelector((state: RootState) => state.loginUser); |
2、用户注册页面
参考用户登录页面,也是客户端渲染,同样使用高级表单组件。注意,需要让注册和登录这两个页面之间能够相互跳转。
页面代码如下:
1 | "use client"; |
效果如图:
3、用户注销
编写退出登录逻辑,退出登录成功时,应该将全局状态重置为 “默认用户”,代码如下:
1 | /** |
由于默认用户在多个位置使用,可以定义为常量,放在 src/constants/user.ts 中:
1 | import AccessEnum from "@/access/accessEnum"; |
给用户头像下拉菜单绑定点击事件:
1 | <Dropdown |
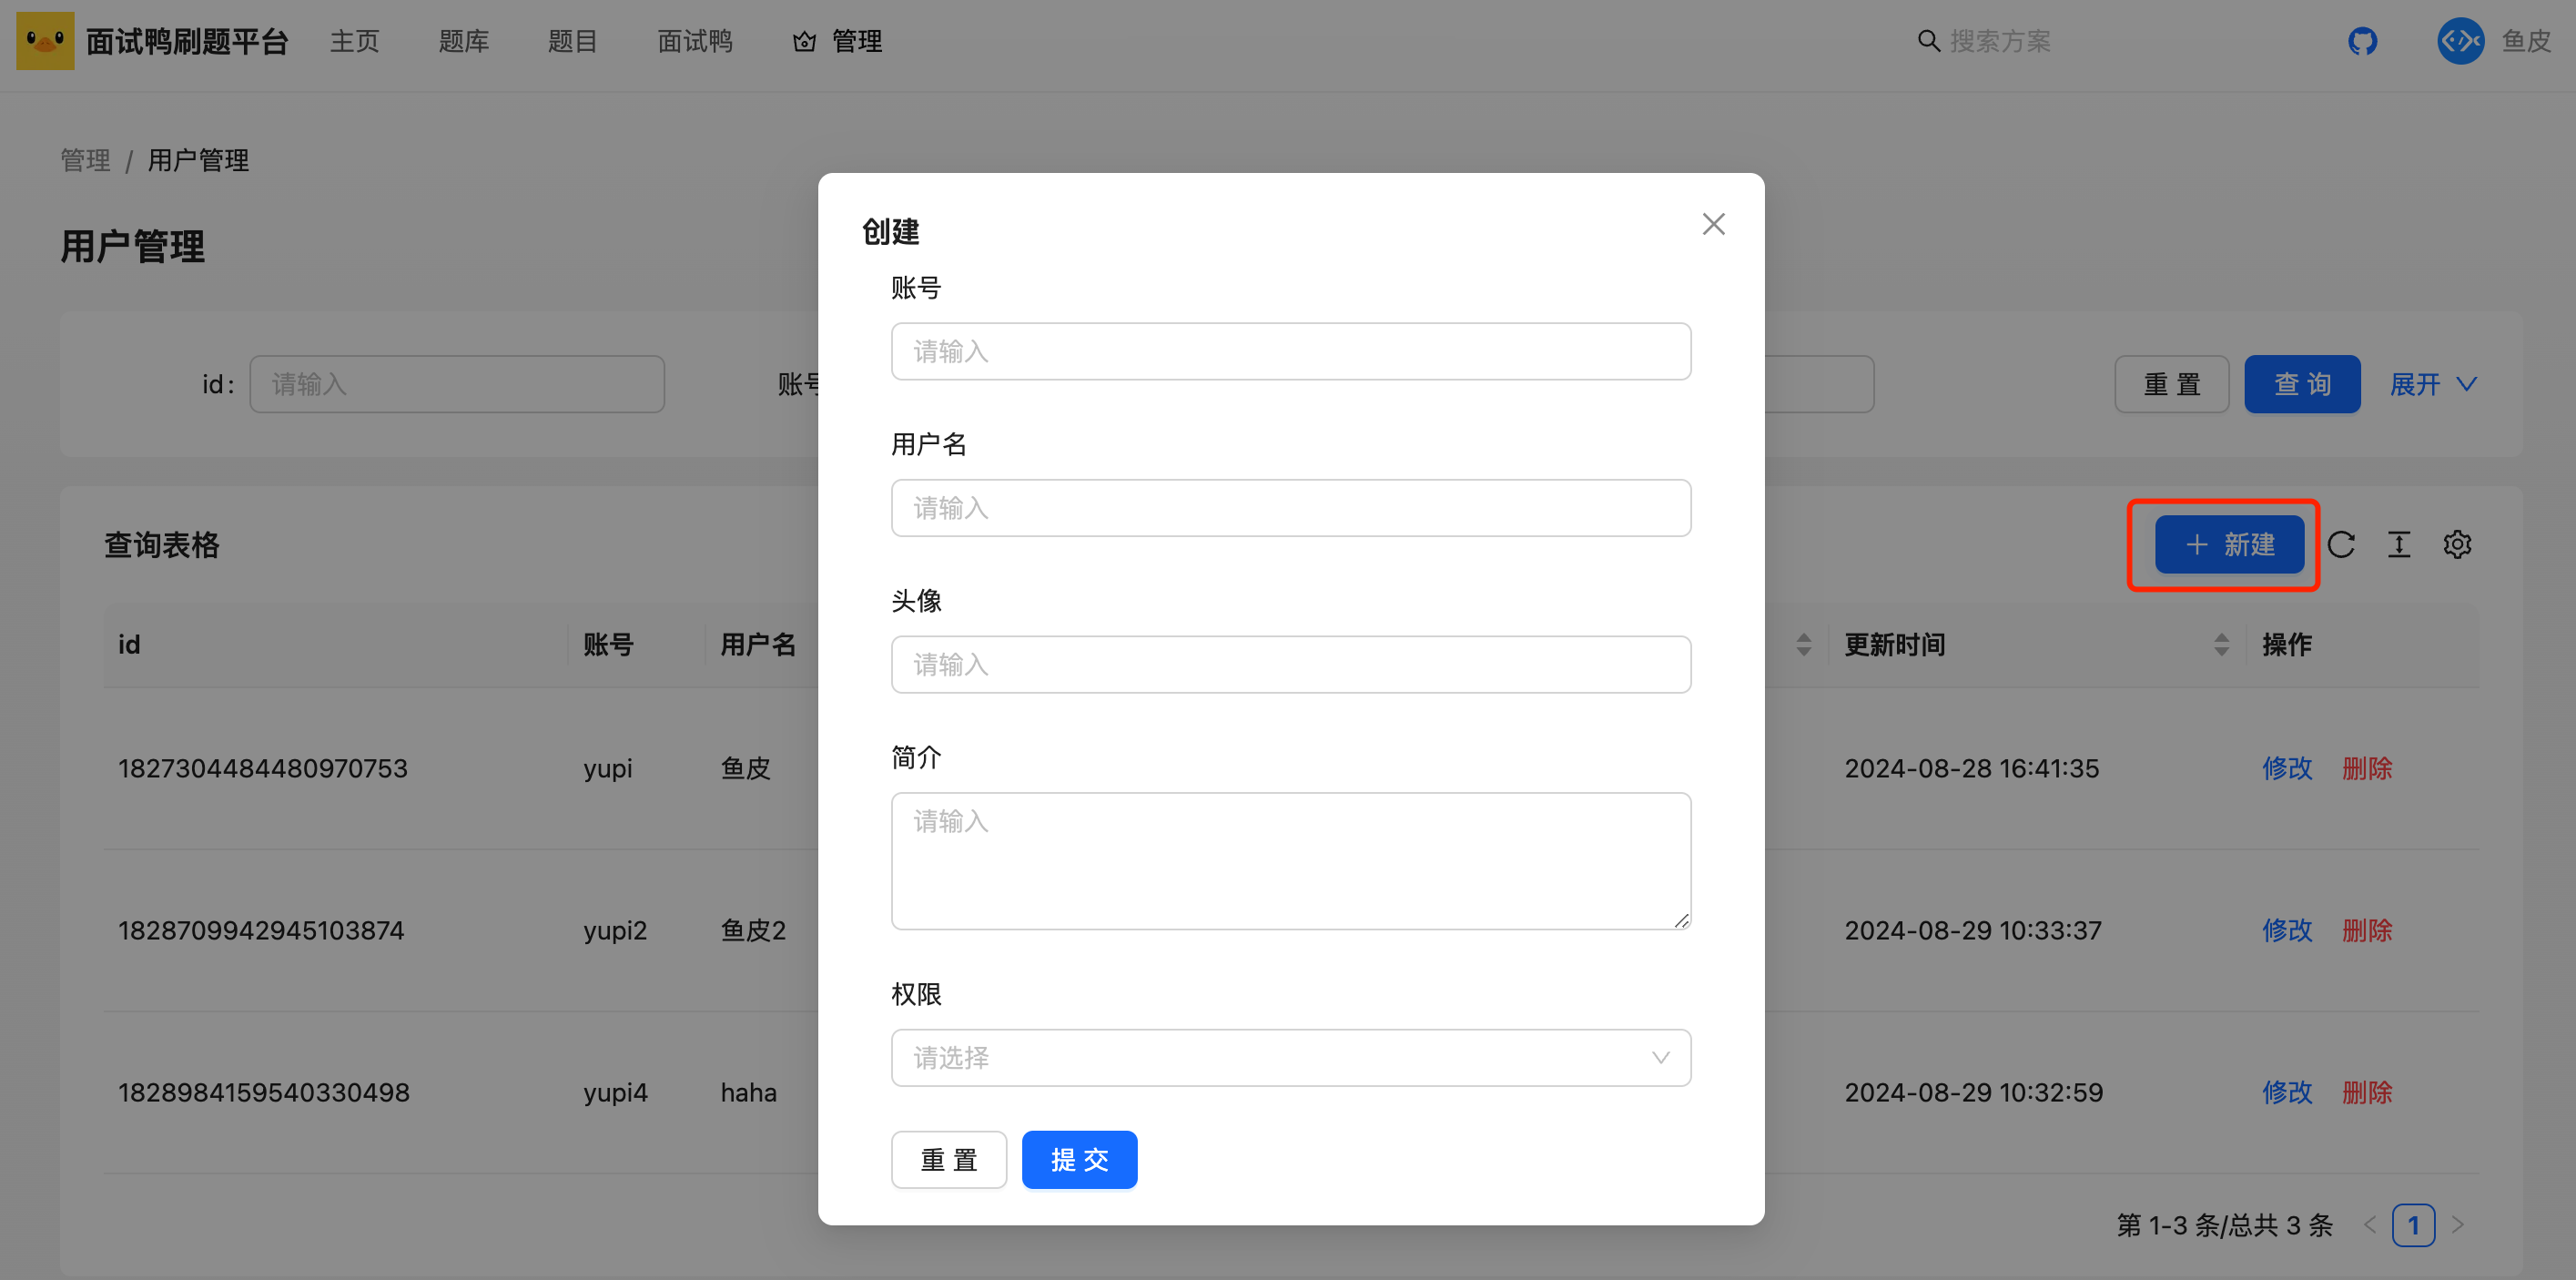
4、用户管理页面
需求:管理用户 - 增删改查(仅管理员可用)P1
页面预期效果:上方搜索栏,下方表格,是一个很标准的管理页面布局。如图:
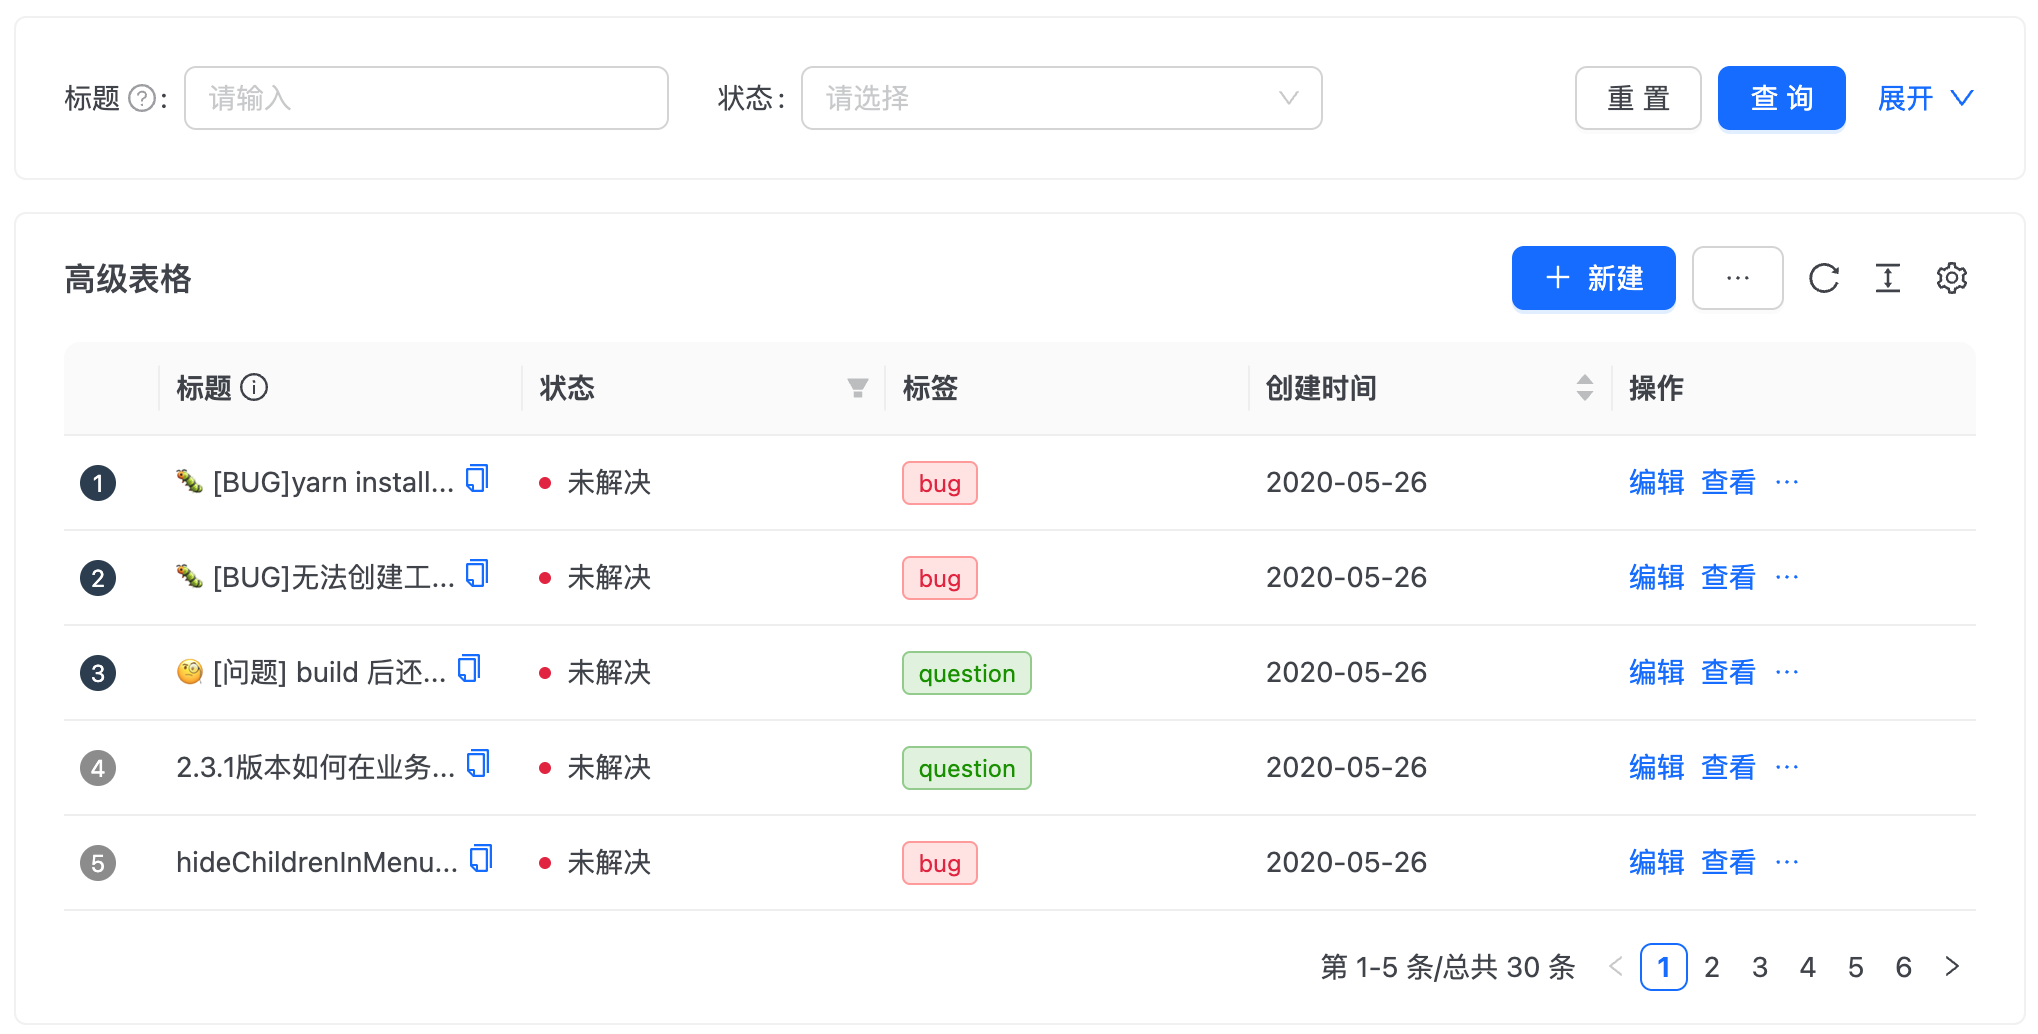
当用户点击新建和修改按钮时,能够打开弹窗,让用户填写信息。
为了简化开发,可以使用 Ant Design ProComponents 的高级表格组件实现。参考文档:https://procomponents.ant.design/components/table
编程导航 的万用前端模板也提供了现成的管理页面,可以直接在此基础上进行修改,效率会更高一些,没必要重复从 0 开发。
前端万用模板:
注意,管理员页面不需要 SEO、对性能也没有特别高的要求,使用客户端渲染就行,开发限制会少一些。
1)创建页面时,先新增路由:
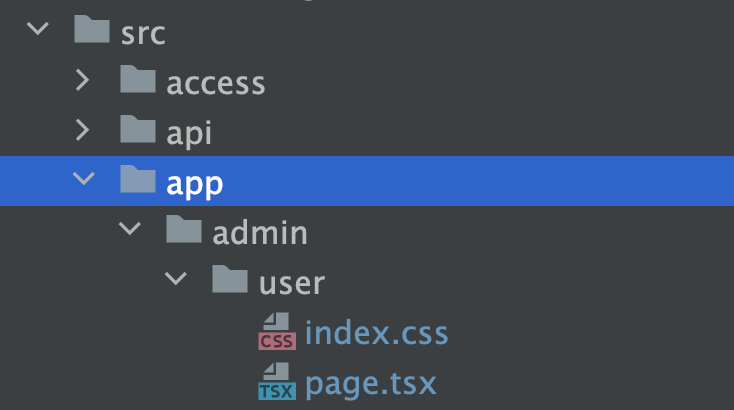
所需的页面文件: page.tsx,代码中有类型错误可忽略
1 | "use client"; |
所需的组件:
CreateModal.tsx:
1 | import { addUserUsingPost } from '@/api//userController'; |
UpdateModal.tsx:
1 | import { addUserUsingPost } from '@/api//userController'; |
新建菜单项配置,有管理员权限才可访问:
1 | { |
2)安装表格组件依赖:
1 | npm i @ant-design/pro-table |
安装失败的话,就在命令后加 --force:
1 | npm i @ant-design/pro-table --force |
3)开发页面。先在页面开头增加 “use client” 声明,表示客户端渲染。
编译成功后访问用户管理界面,如下图所示:
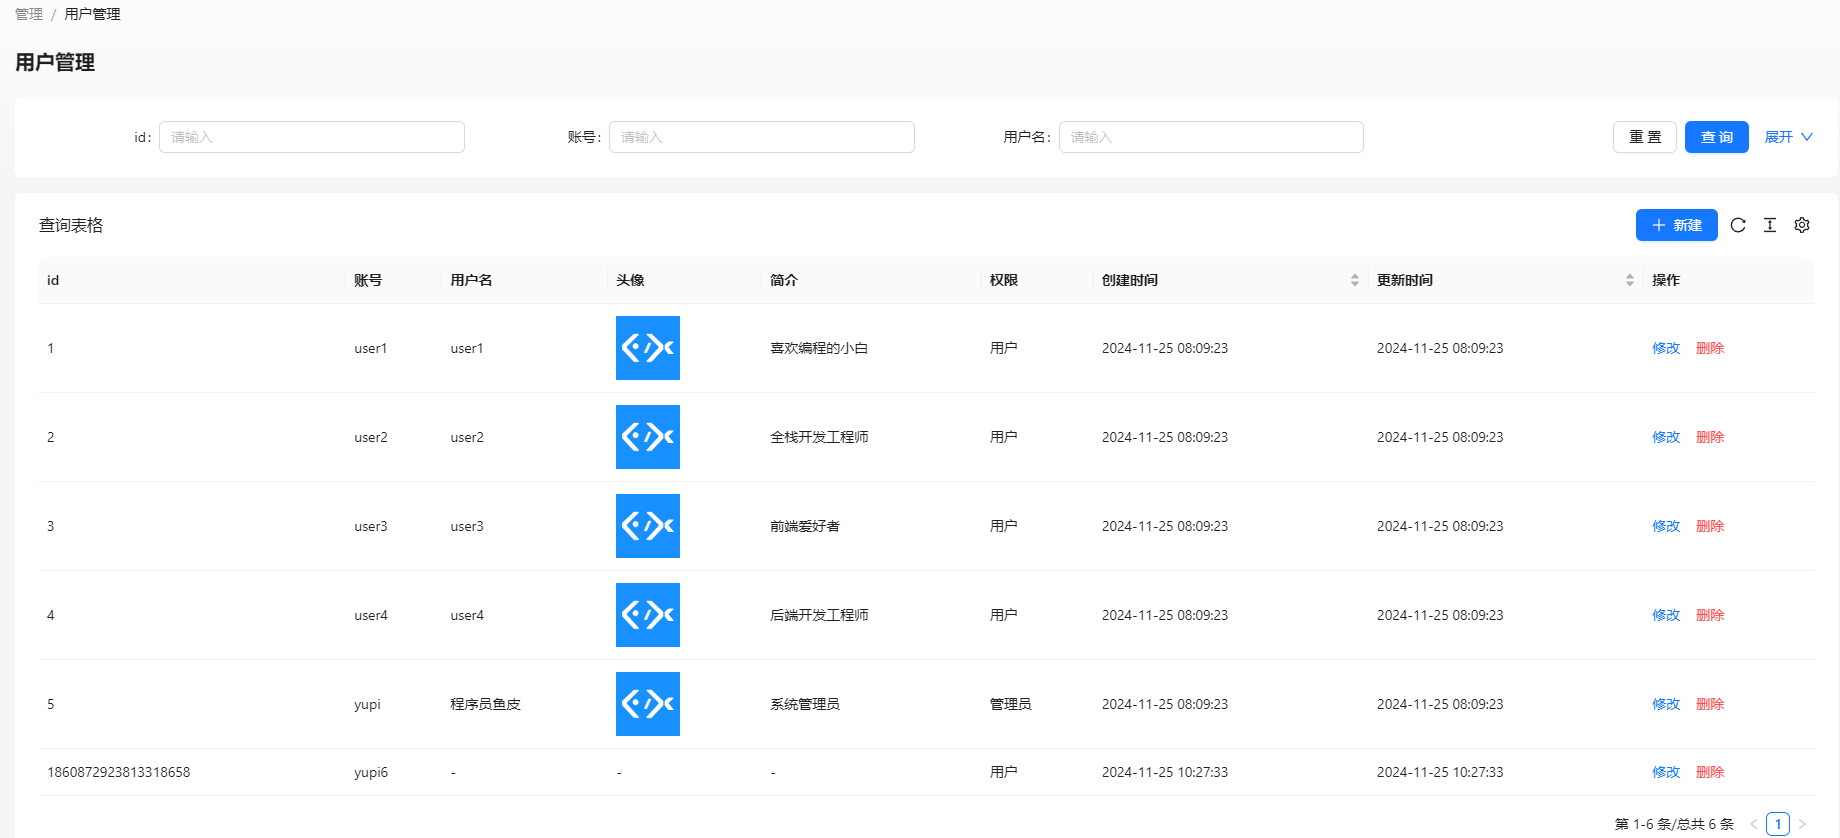
基于表格组件的开发规范,先定义要展示哪些表格列,可参考官方文档:https://procomponents.ant.design/components/table#columns-%E5%88%97%E5%AE%9A%E4%B9%89
示例代码如下:
1 | const columns: ProColumns<API.User>[] = [ |
其中,我们自定义了操作列,提供修改和删除两个按钮。对于修改操作,我们需要 currentRow 变量来记录用户要修改哪条数据,便于修改的时候展示老数据。
1 | // 当前用户点击的数据 |
4)使用高级表格组件,编写请求函数、新建操作工具栏等。
示例代码如下:
1 | <ProTable<API.User> |
5)实现删除功能。主要是编写删除函数:
1 | const handleDelete = async (row: API.User) => { |
给删除按钮添加点击事件:
1 | <Typography.Link type="danger" onClick={() => handleDelete(record)}> |
6)开发创建数据弹窗组件。
💡 该组件由于只被用户管理页面使用,不用作为全局组件,而是放在 admin/user 目录下的 components 目录中即可:
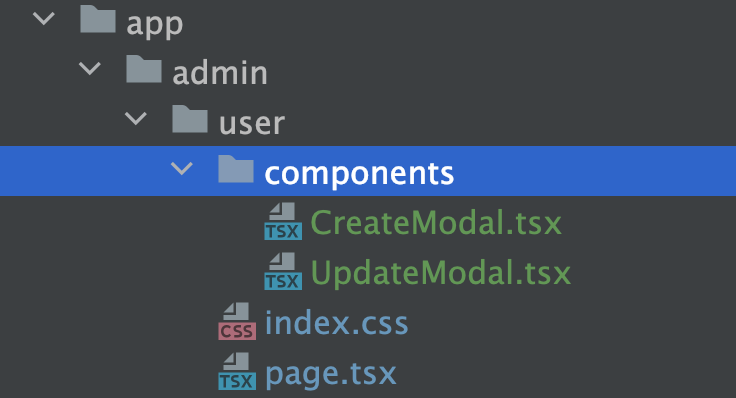
首先定义属性,用于控制弹窗的显隐、以及成功提交或取消弹窗事件:
1 | interface Props { |
基于高级表格自带的表单类型,传入管理表格页面已经定义好的 columns,能够自动生成表单项。
1 | <Modal |
最后编写提交函数,调用后端实现数据创建:
1 | const handleAdd = async (fields: API.UserAddRequest) => { |
在用户管理页面引入该组件,通过定义 visible 状态来控制弹窗的显隐:
1 | // 是否显示新建窗口 |
点击工具栏上的新建按钮时,会打开弹窗(设置 visible 状态为 true):
1 | <Button |
效果如图:
7)开发修改数据弹窗组件。
过程跟上一步类似,区别在于需要给组件多传入 “老数据”:
1 | interface Props { |
需要给表单补充初始数据,并且在提交时,需要校验老数据是否存在:
1 | <ProTable |
至此,用户模块开发完成。
扩展
1)用户管理页面可以通过给删除增加二次确认,减少误操作概率。
使用 Popconfirm 组件可轻松实现:https://ant-design.antgroup.com/components/popconfirm-cn
2)用户管理页面实现多列排序功能
前端 ProTable 已经默认支持了,通过 request 函数的 sort 参数可以获取到排序条件,需要让后端支持处理多列排序。
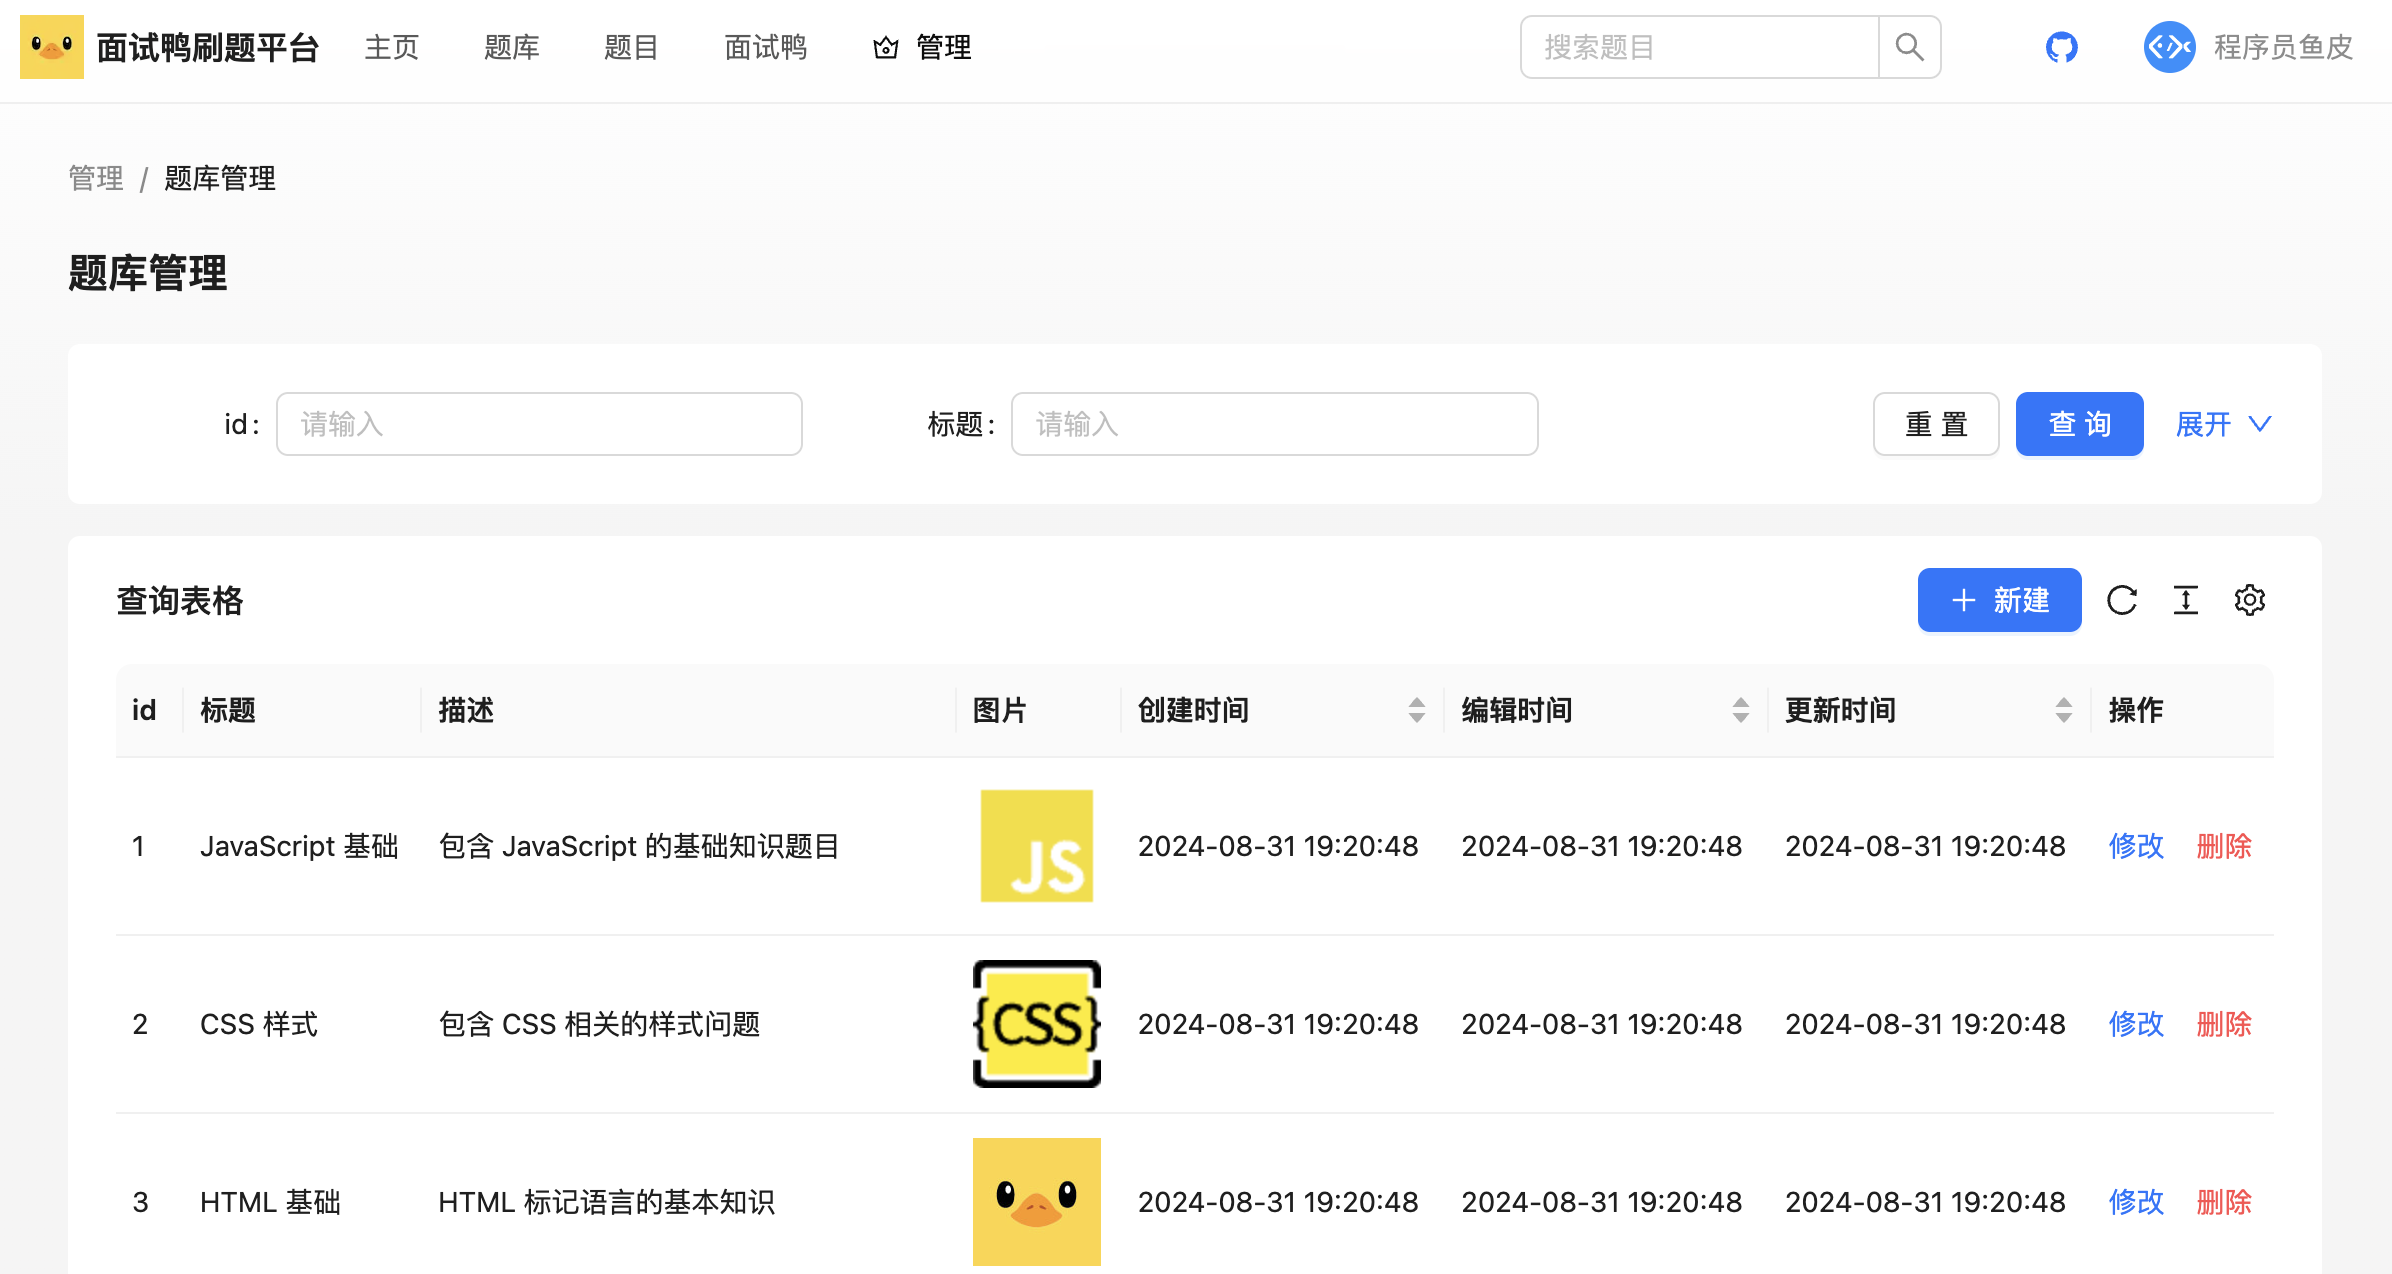
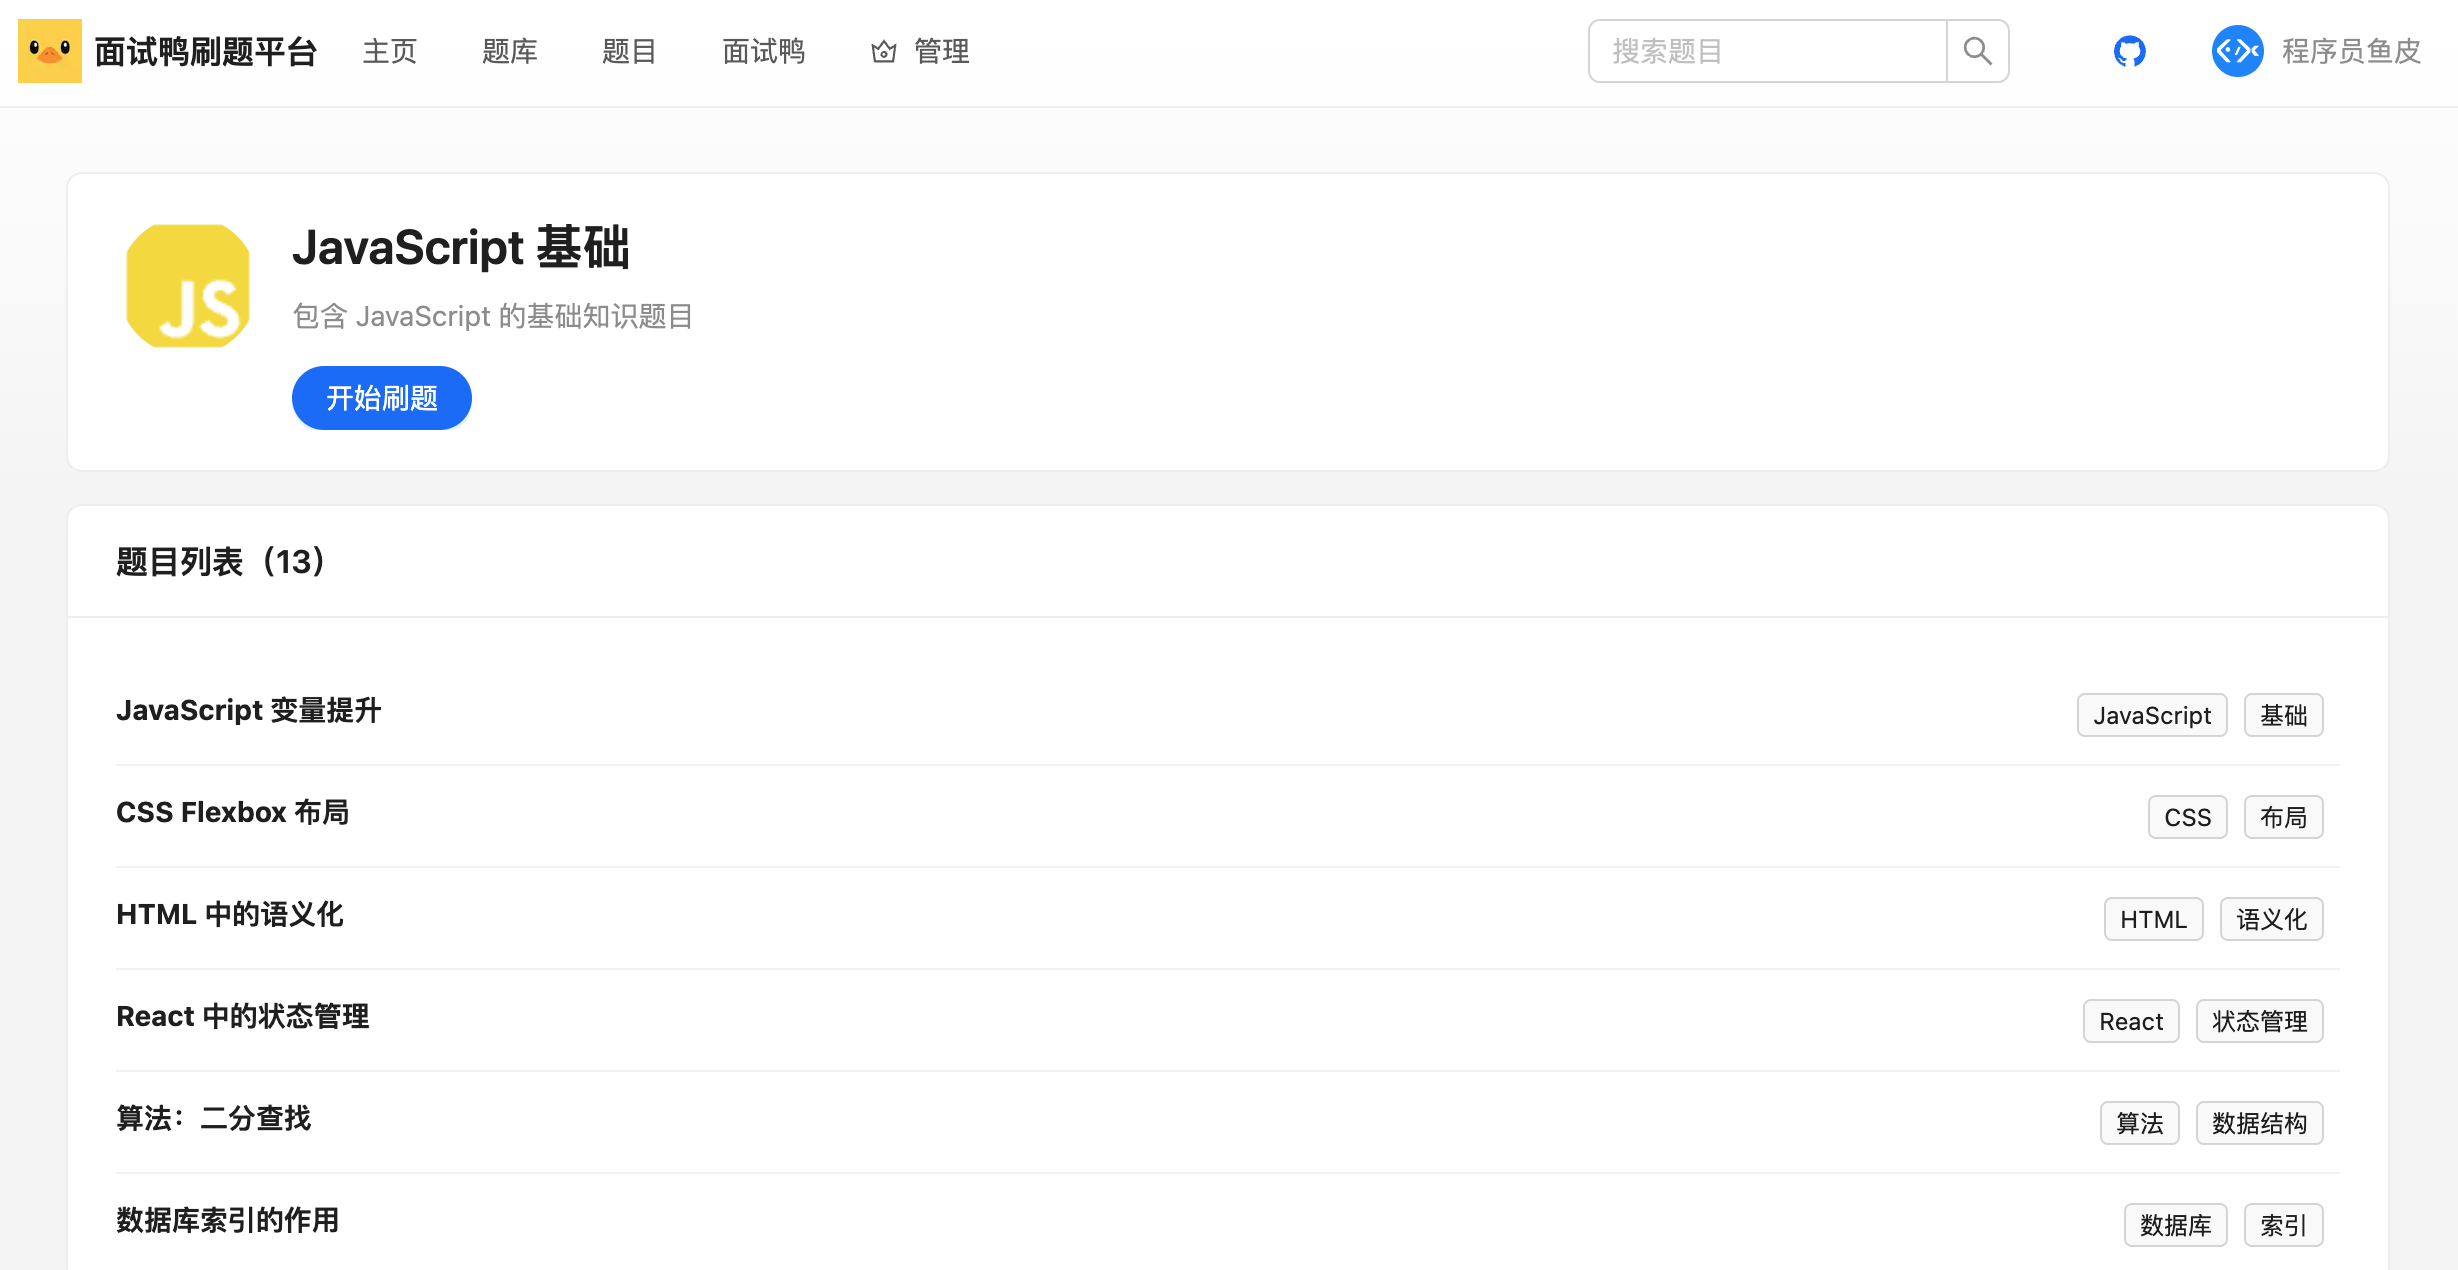
题库管理页面
对应需求:【管理员】管理题库 - 增删改查
其他管理页面跟用户管理页面极其相似,没什么技术要点,复制用户管理页面后略做修改即可,请大家自行开发。
添加菜单项配置:
1 | { |
开发页面,关键是 columns 表格列配置:
1 | const columns: ProColumns<API.QuestionBank>[] = [ |
效果如图:
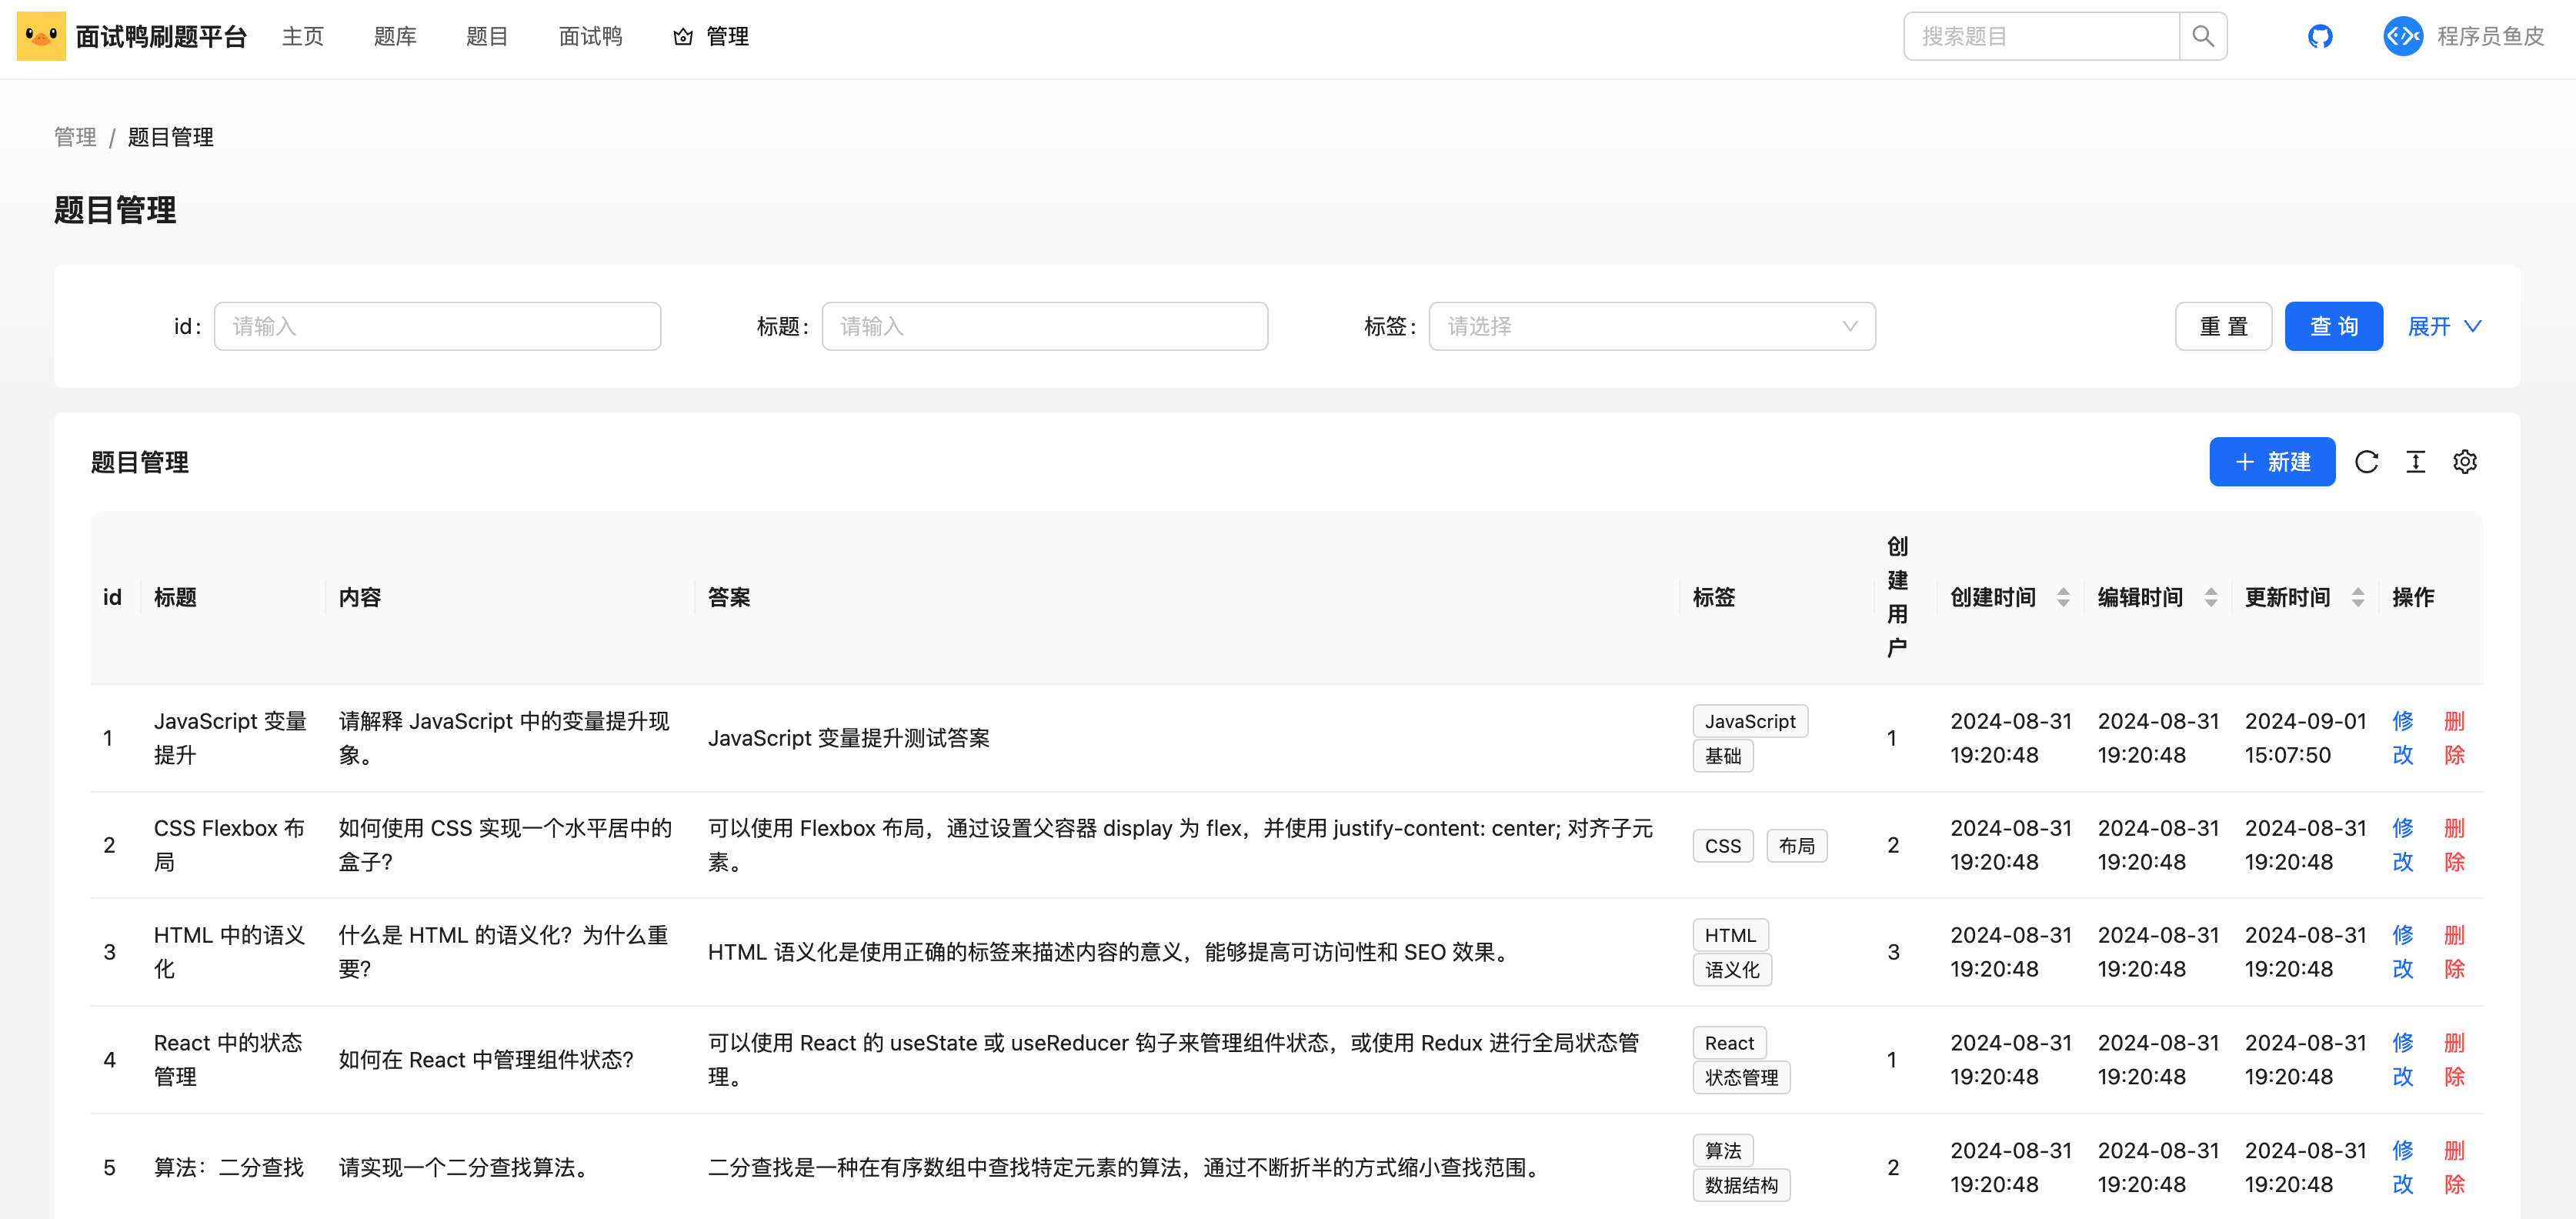
题目管理页面
对应需求:【管理员】管理题目 - 增删改查1633846519943716865_0.28286211834920794
1、基础表格开发
添加菜单项配置:
1 | { |
表格列配置:
1 | const columns: ProColumns<API.Question>[] = [ |
2、处理特殊逻辑
1)自定义标签渲染,把字符串转为标签列表:
1 | { |
TagList 是用于渲染标签列表的组件:
1 | import { Tag } from "antd"; |
2)需要修改题目内容和答案的输入框为我们封装的 MdEditor 编辑器,可参考 ProTable 官方文档的 自定义表单项渲染。
1 | { |
3、问题修复(完善接口)
测试时,发现创建和更新题目的标签失败,这是因为后端接口没有补充 tags 字符串到 tagList 列表的转换,需要给 addQuestion 和 updateQuestion 接口补充转换逻辑。示例代码如下:
1 | Question question = new Question(); |
注意,更新数据时,需要将 tags 转换成数组后作为表单初始值,否则无法正常同步到表单。可以在 UpdateModal 中自己定义初始值对象:
1 | // 表单转换 |
然后在 ProTable 组件中使用初始值对象:
1 | <ProTable |
页面最终效果如图:
页面完整代码如下,仅供参考:
1 | "use client"; |
二、核心页面开发
主页
需求:展示有吸引力的内容,比如展示部分最新题库、部分最新题目
页面结构:从上到下,依次是最新题库和最新题目板块,每个版块展示 12 条数据
💡 分页条数尽量是 3、4 的倍数,比如 12 和 24,可以同时兼容 3 列、4 列。
1、页面整体结构开发
1)先编写页面结构:
1 | "use server"; |
2)使用 Ant Design 的 Flex 组件,在标题右侧补充 “查看更多” 到题库列表页的跳转:
1 | <Flex justify="space-between" align="center"> |
3)请求题库和题目列表数据并展示:
1 | export default async function HomePage() { |
可以先在页面中展示获取到的数据,确保调用正常:
1 | {JSON.stringify(questionBankList)} |
2、题目列表组件
新建题库列表和题目列表 2 个组件,展示获取到的数据,便于复用。
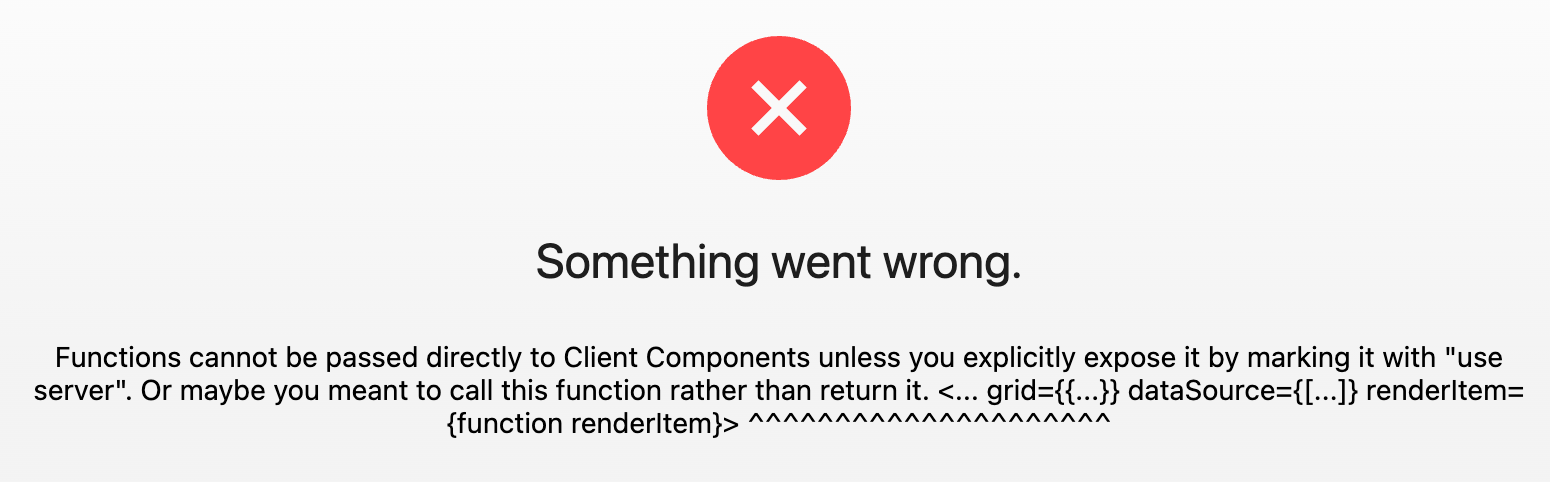
💡 注意,组件要使用客户端渲染,不然会报错:
开发题库列表组件的注意事项:
- 使用 Ant Design 的 Card.Meta 展示单个题库,参考文档
- 由于题库有图片,名称不长,适合使用响应式栅格列表组件 List,通过编写 grid 实现响应式布局,参考文档
- 使用文本省略组件,让描述显示不超过一行,参考文档
- 点击题库后,可以跳转到题库详情页,使用 Next.js 的 Link 组件即可
代码如下:
1 | "use client"; |
3、题目列表组件
开发题目列表组件的注意事项:
- 题目没有图片,名称较长,适合使用水平基础列表组件 List,参考文档
- 点击题目后,可以跳转到题目详情页
代码如下:
1 | "use client"; |
其中,TagList 可以单独封装为一个组件,便于复用(题目详情页也要用)。代码如下:
1 | import { Tag } from "antd"; |
4、其他优化
由于页面可视区域过宽,会让用户的视野过于分散:
可以限制下页面最大宽度,在 app/globals.css 中写一个限制宽度的通用类名:
1 | .max-width-content { |
给需要限制宽度的页面增加该类名即可:
1 | <div id="homePage" className="max-width-content"> |
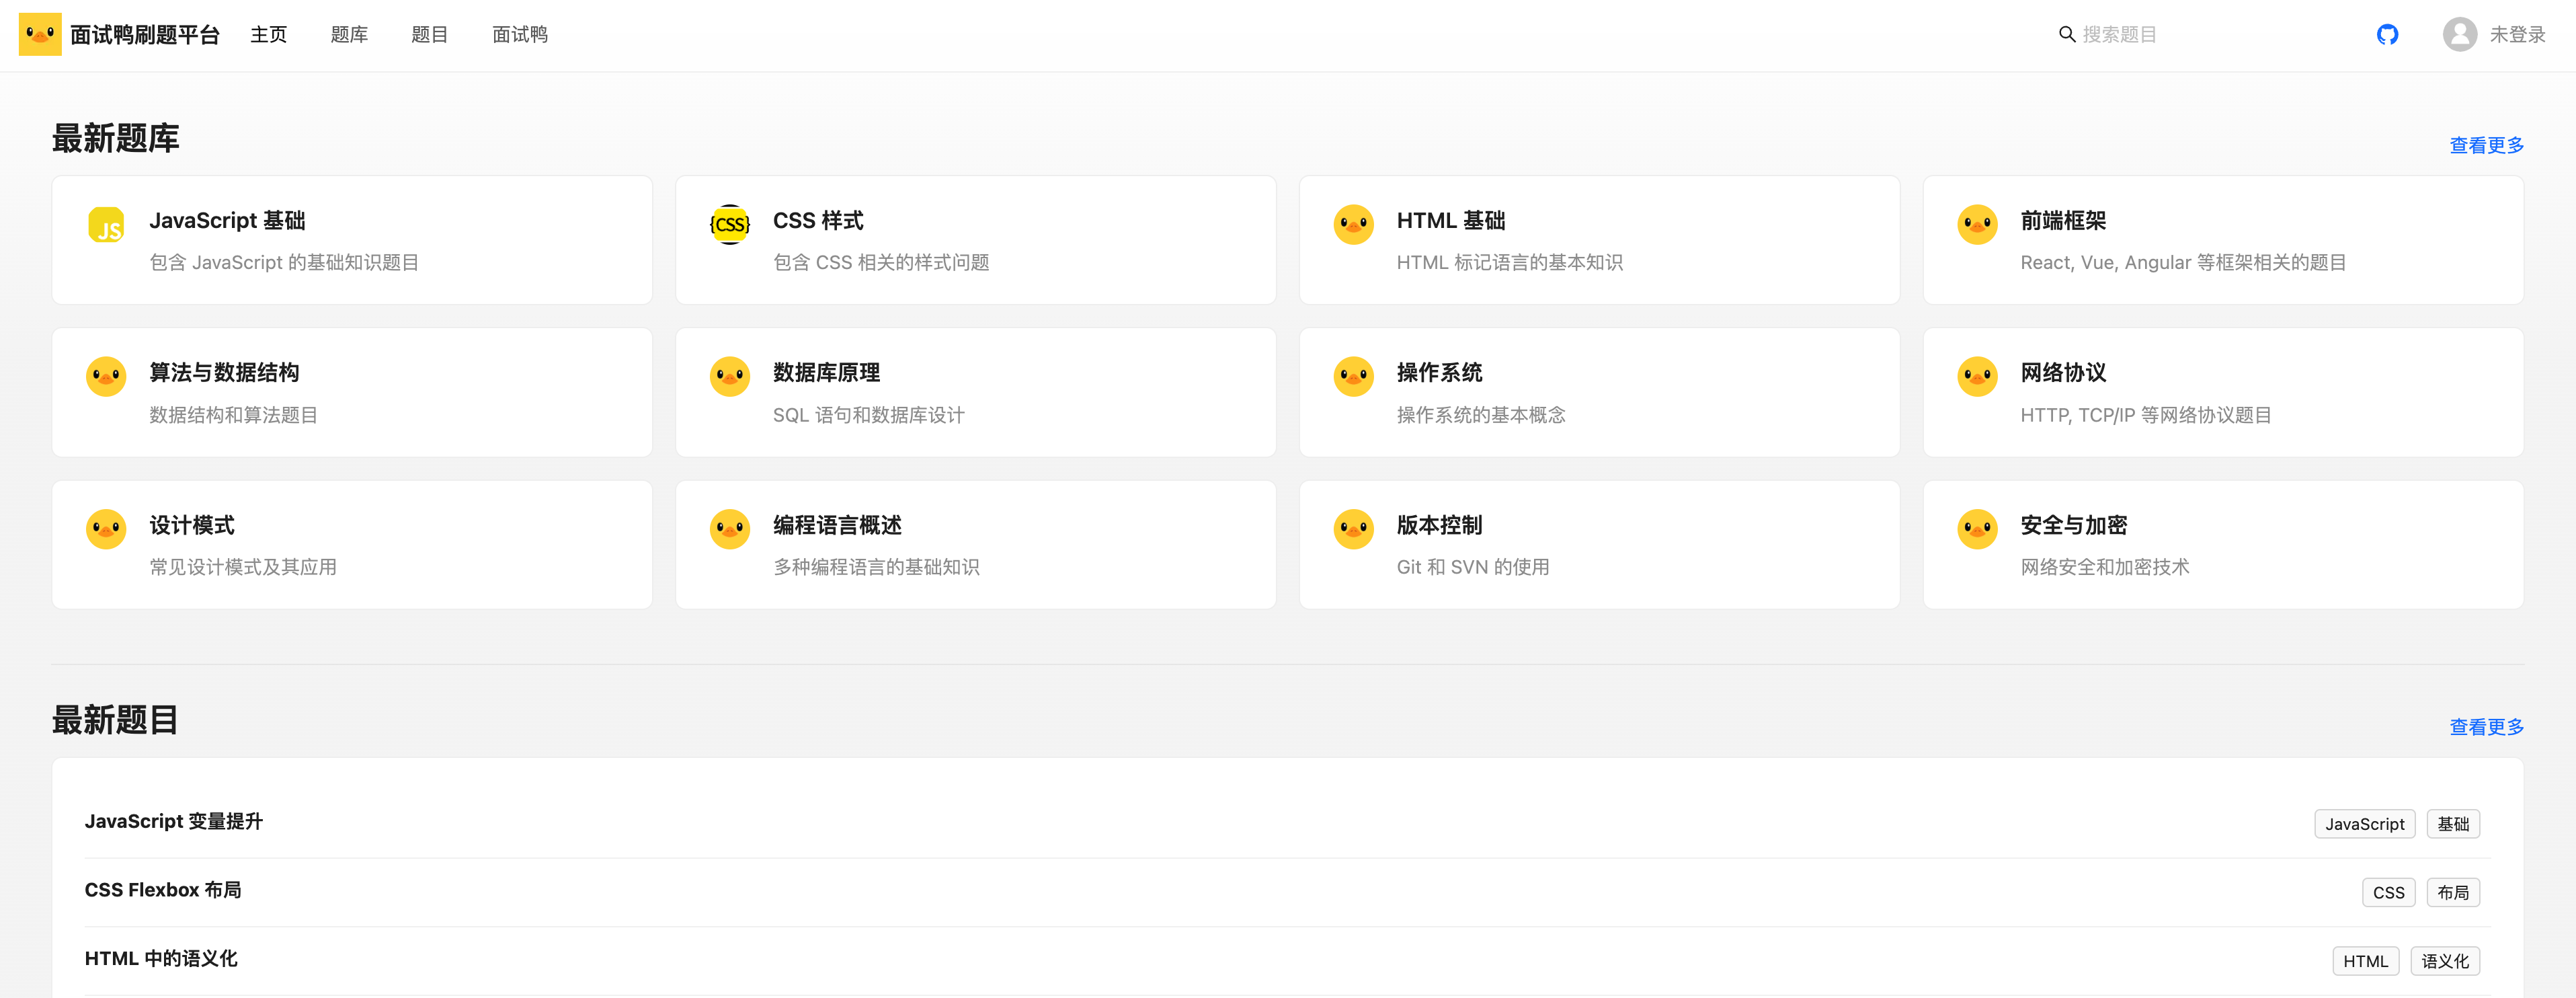
最终,主页效果如图:
扩展
1)当题库和题目较多时,可以允许用户按照最新、热度、精选等方式对题库和题目进行排序。
2)可以给主页增加吸引人的 banner 图片,或者添加公告栏来通知用户活动信息
题库列表页
需求:展示所有题库列表
页面结构:跟主页的题库列表类似,复用题库列表组件即可轻松完成开发。
因为考虑到系统题库数量不多,可以不需要分页实现,减少开发成本,让后端支持返回更多题库即可。
1)修改后端获取题库列表接口,提升允许抓取的页面大小为 200:
1 |
|
2)开发页面,基本直接复制主页代码就能完成。代码如下:
1 | "use server"; |
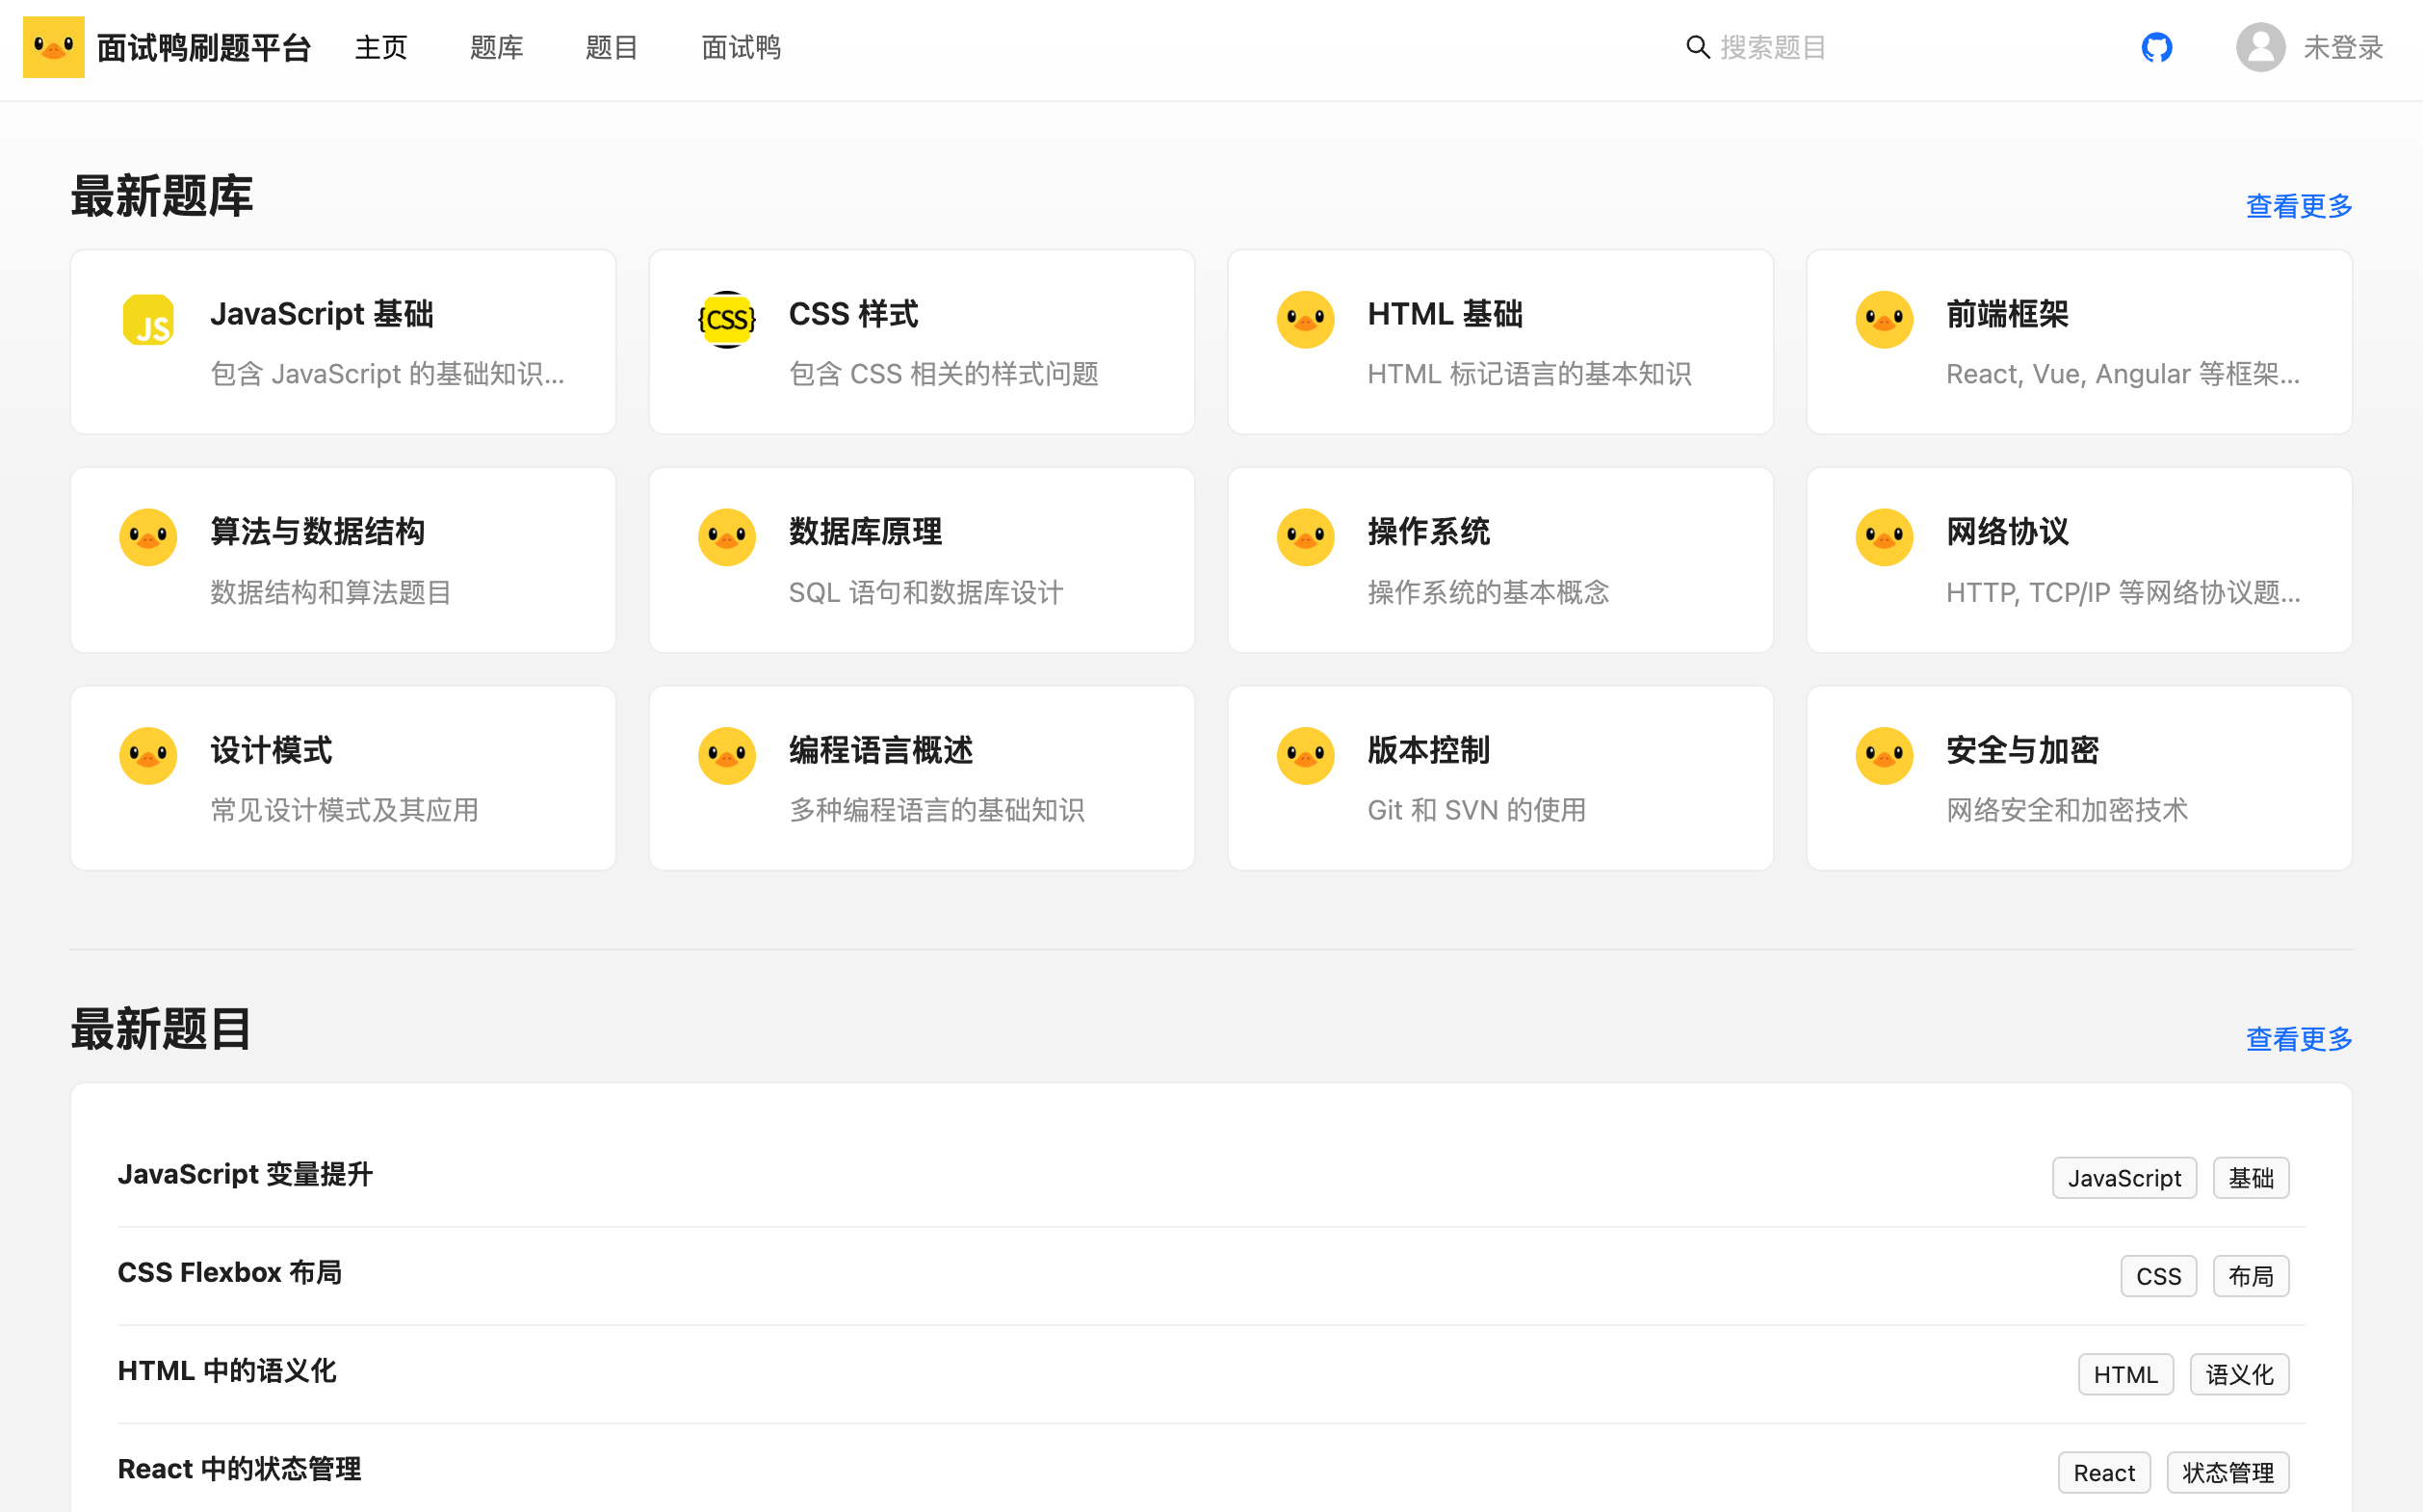
题库列表页的效果如图:
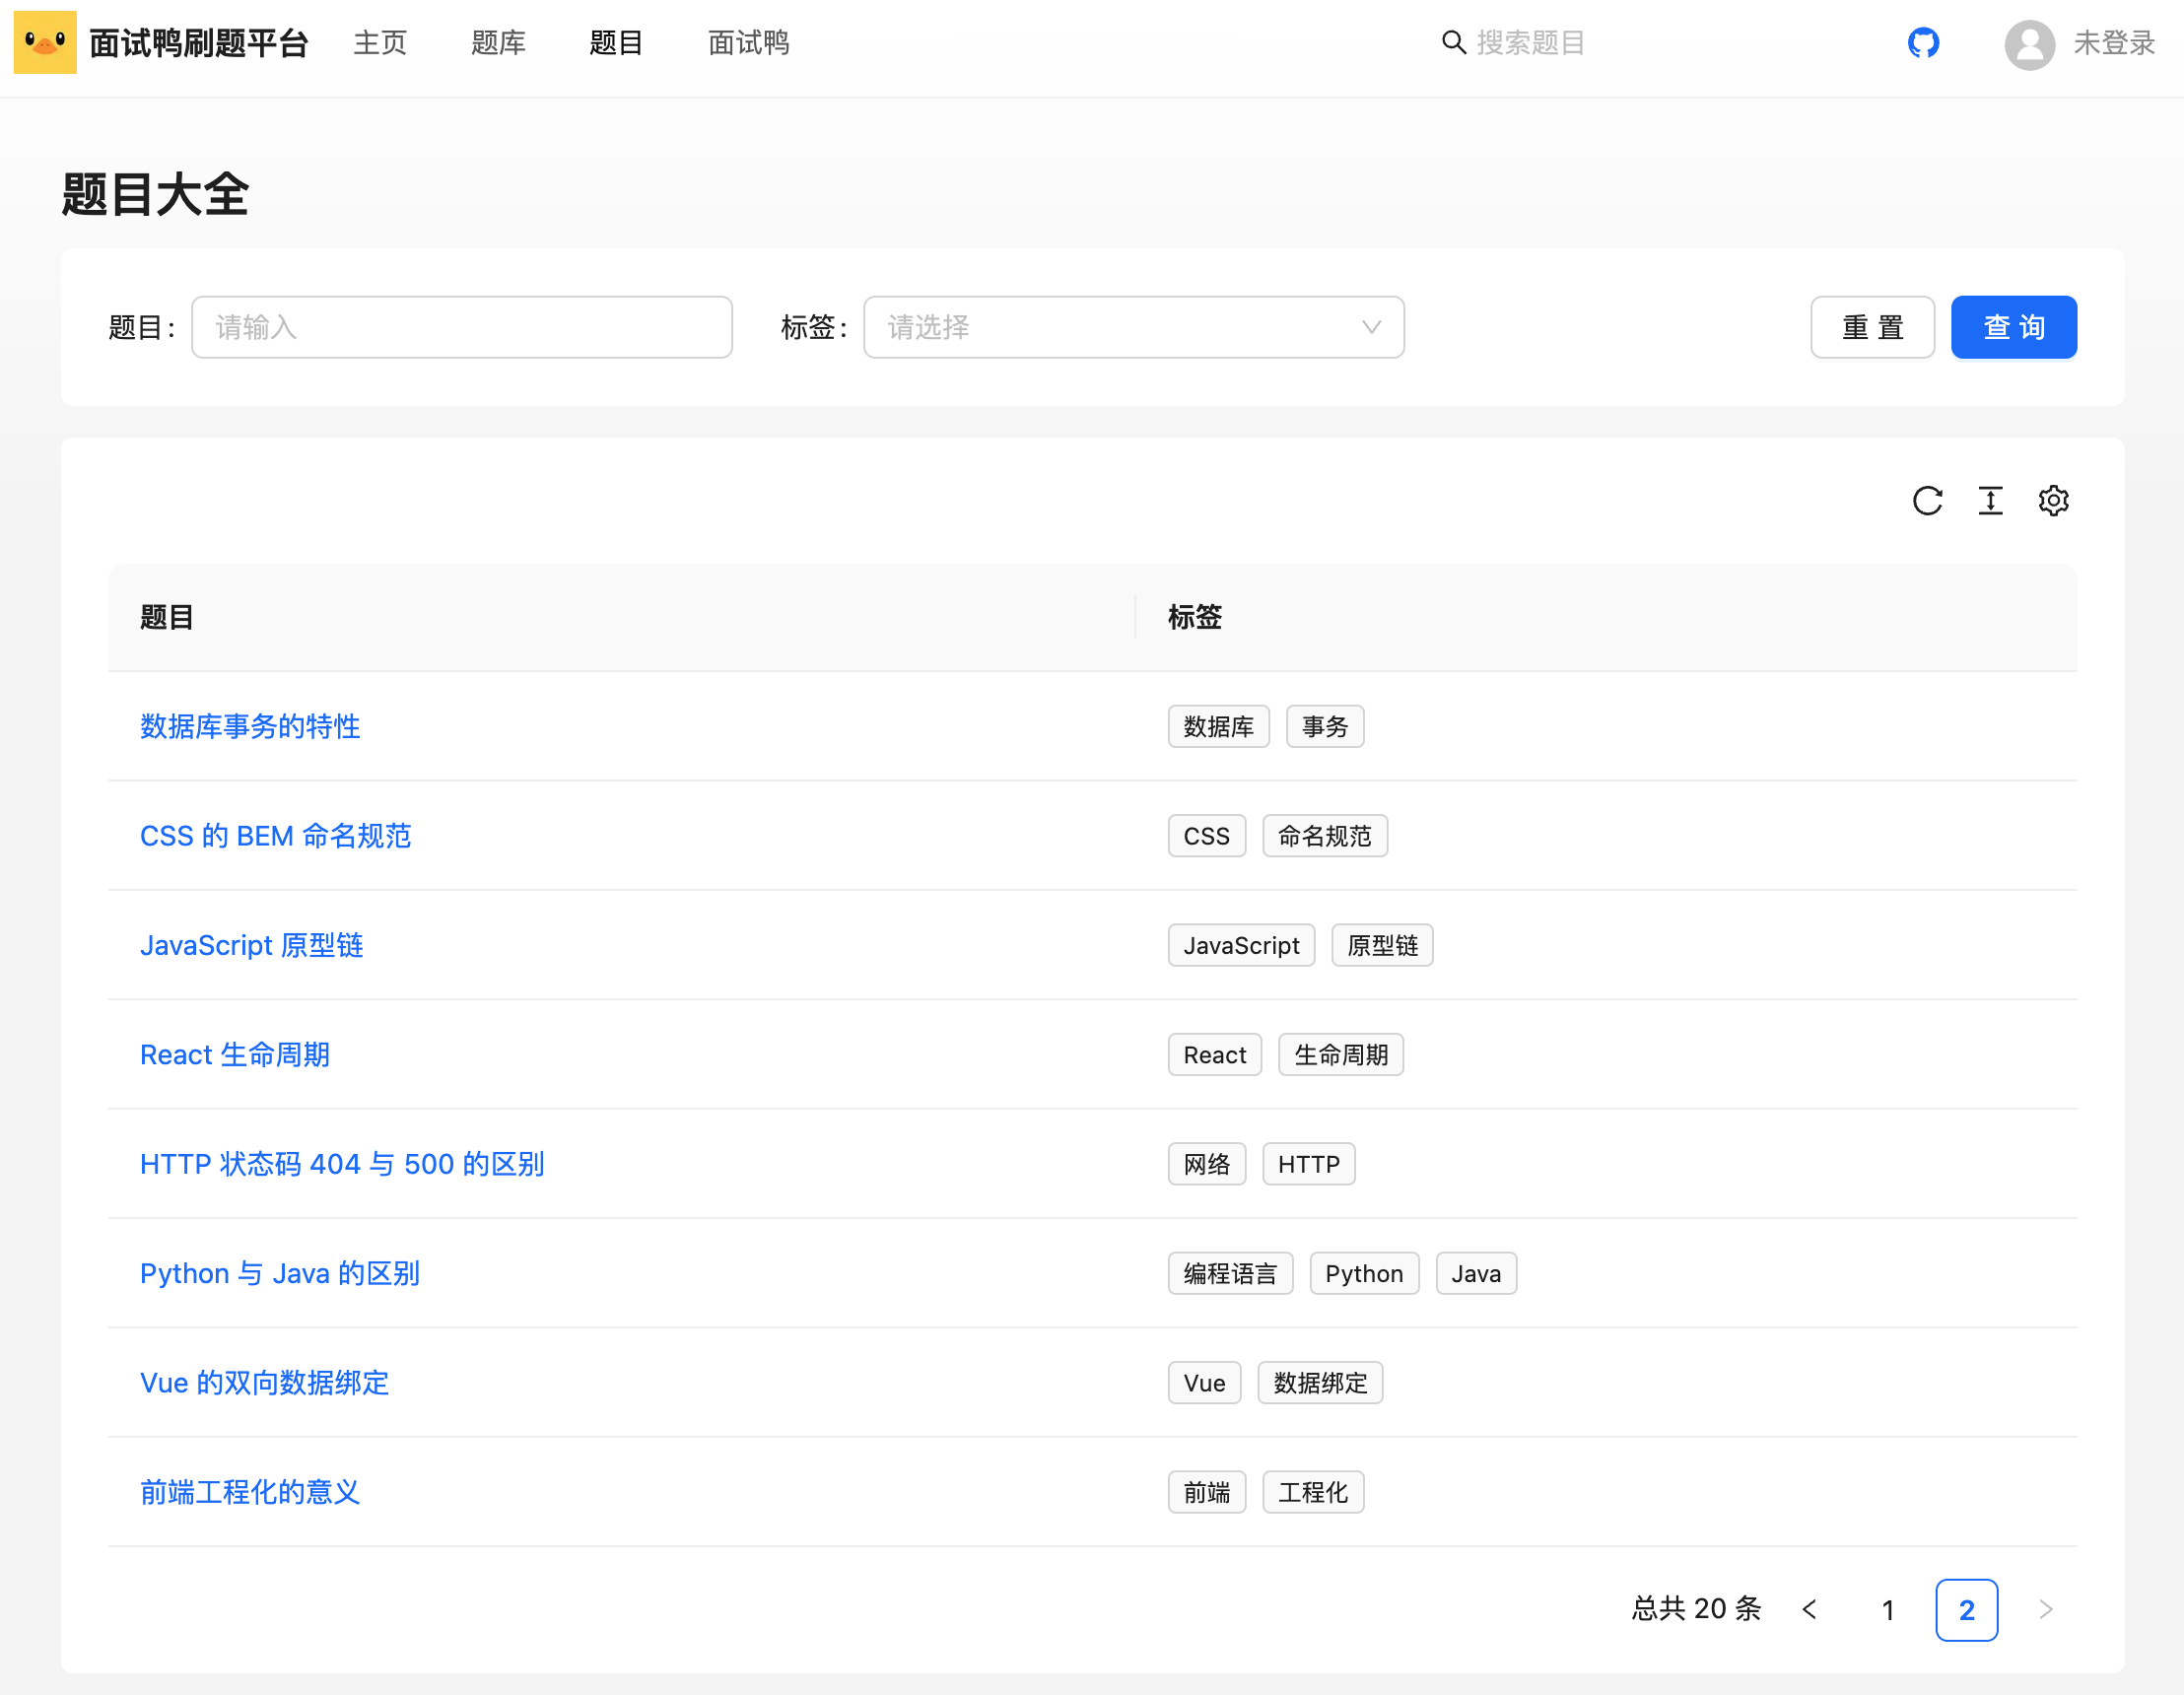
题目搜索页
需求:题目搜索页和题目大全页本质上是同一个页面,都是能让用户通过各种条件搜索题目。为了降低开发成本,可以统一。
结构:可以用表格的形式展示题目列表,由于题目数较多,需要支持分页。
需要支持的搜索条件:
- 题目名称
- 标签
1、页面整体结构开发
参考主页,开发基础页面结构,并获取到题目列表数据:
1 | import Title from "antd/es/typography/Title"; |
2、题目表格组件
可以封装 QuestionTable 题目表格组件,作为公共组件,便于后续复用。
跟管理页面开发类似,使用 Ant Design ProComponents 的高级表格组件,可以轻松完成。
首先要执行命令安装组件:
1 | npm i @ant-design/pro-table --force |
由于该组件涉及到分页(客户端交互),要使用客户端渲染,开发体验跟使用普通的 Vue、React 框架类似。
1)通过高级表单组件自己的规则,改写 request 请求函数,即可实现请求条件改变时自动触发查询,自动支持分页和筛选。代码如下:
1 | "use client"; |
3、使用表格组件
在题目列表页引入组件:
1 | <QuestionTable /> |
需要将页面宽度调整为 100%,否则表格宽度会动态变化。代码如下:
1 | #questionsPage { |
效果如图:
4、支持服务端渲染
需要支持服务端渲染,外层页面如果已经在服务端取得了数据,可以直接展示,而不用等到客户端渲染时再发起请求。
解决方案很简单,给题目表格组件新增默认题目列表、默认总数这 2 个属性,外层页面传递已获取到的数据,作为表格组件的初始数据状态即可。
1 | interface Props { |
在表格组件中,将 questionList 和 total 定义为状态,然后在 request 函数中改变状态,相当于将 ProTable 作为受控组件使用。
修改的代码如下:
1 | interface Props { |
但还有个问题,首次服务端已经获得了数据,客户端就没必要再请求一次了,可以新增 init 变量进行判断。
代码如下:
1 | const [init, setInit] = useState<boolean>(true); |
在 request 函数开头添加判断逻辑:
1 | // 首次请求 |
5、和上方搜索条联动
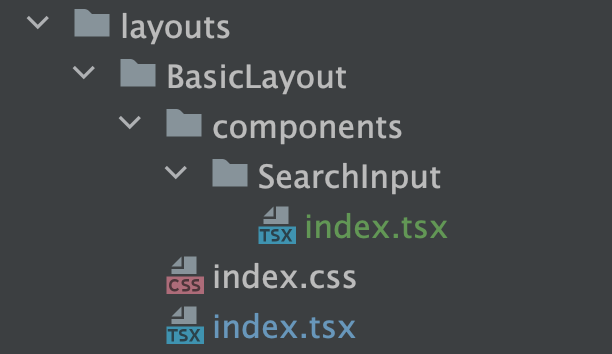
1)修改 BasicLayout 的搜索输入框,搜索时携带搜索文本跳转到题目搜索页:
1 | /** |
可以将搜索输入框抽象为独立组件,在 BasicLayout 下新建 components,因为该搜索组件目前只有该布局用到。
2)题目大全页面需要获取查询文本,进行操作。
在 Next.js 中,可以通过 searchParams 轻松获取到 url 的查询参数:
1 | export default async function QuestionsPage({ searchParams }) { |
然后要在 2 个地方使用搜索文本参数,一方面是根据搜索文本在服务端时查询到初始数据:
1 | try { |
另一方面需要将其传递给题目表格组件,作为默认搜索条件。为了通用性,定义 defaultSearchParams 对象类型的属性,可传递多个默认搜索条件字段。
题目表格组件的属性新增字段:
1 | interface Props { |
利用 ProTable 的初始值属性 initialValues,可以将默认搜索条件作为初始值传递给搜索表单:
1 | <ProTable |
3)题目列表页面传入搜索条件:
1 | <QuestionTable defaultQuestionList={questionList} defaultTotal={total} defaultSearchParams={{ |
题库详情页
需求:从上到下展示题库信息、以及题库内的题目列表
1、基础页面开发
新建动态路由页面:
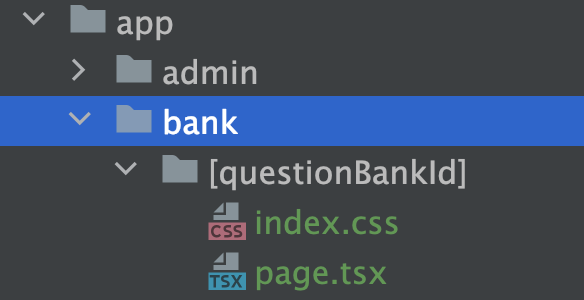
在页面中可以通过 params 获取到动态参数:
1 | export default async function BankPage({ params }) { |
先请求题库详情数据,如果没有找到对应的数据,直接返回一段文案作为错误处理结果。
💡 也可以使用 Next.js 支持的全局错误处理 ErrorBoundary。
代码如下:
1 | let bank = undefined; |
💡 注意,服务端渲染无法使用 <AA.BB> 引入子包的组件,可以直接引入
有了数据后,就可以开发页面了,主要有以下几个注意事项:
- 页面上方复用 Ant Design 的 Card.Meta 组件展示题库信息
- 页面下方复用 QuestionList 题目列表组件,展示题目列表
此处是考虑到同一题库内的题目数量不多,所以暂时不需要分页,可以将 pageSize 调整大一些,直接使用题目列表组件即可。如果需要实现分页,可以使用之前封装的 QuestionTable 题目表格组件。
页面代码如下:
1 | import Title from "antd/es/typography/Title"; |
2、问题修复和优化
调试过程中,可能会发现一些问题。
1)需要修复接口问题:在 getQuestionBankVOById 接口中,没有把查询请求的分页条件和其他过滤条件传递给 questionService.listQuestionByPage 方法,可以按需调整。
还要将该接口返回值的 questionPage 类型从 Question 改为 QuestionVO,跟主页获取题目分页列表接口保持一致。
修改后的接口代码如下:
1 |
|
2) 给 QuestionList 题目列表组件补充 cardTitle 属性,更优雅地展示标题。
1 | interface Props { |
应用到组件内 Card 的 title 属性:
1 | <Card className="question-list" title={cardTitle}> |
然后可以在页面中使用属性,展示 “题目列表” 4 个字和当前题库下的题目总数:
1 | <QuestionList |
3)如果题库为空,接口还是会返回所有题目数据。这是因为之前后端 service 中分页获取题目列表的 listQuestionByPage 方法有误。当查询不到题库题目关系时,应该直接返回空页面,而不是不限定 questionId in 的条件,导致了全量查询。
修改代码如下:
1 | if (CollUtil.isNotEmpty(questionList)) { |
3、超链接跳转
提供 2 种跳转到题目详情页进行刷题的方式。
1)补充开始刷题按钮,默认跳转到第一道题目,没有题目则禁用:
1 | // 获取第一道题目,用于 “开始刷题” 按钮跳转 |
按钮代码如下:
1 | <Button |
2)之前的题目列表页跳转到的是单个题目详情,而从题库点开的题目应该是进到题库题目详情页,会额外在左侧展示题库内的其他题目。所以需要区分题库详情页中题目列表项的点击跳转地址。
给题目列表组件增加 questionBankId 属性:
1 | interface Props { |
可以根据题库 id 是否存在,来区分跳转地址:
1 | <Link |
题库详情页的效果如图:
扩展
当题库过多时,可以采用滚动下拉分页加载。React 有现成的无限滚动加载组件。
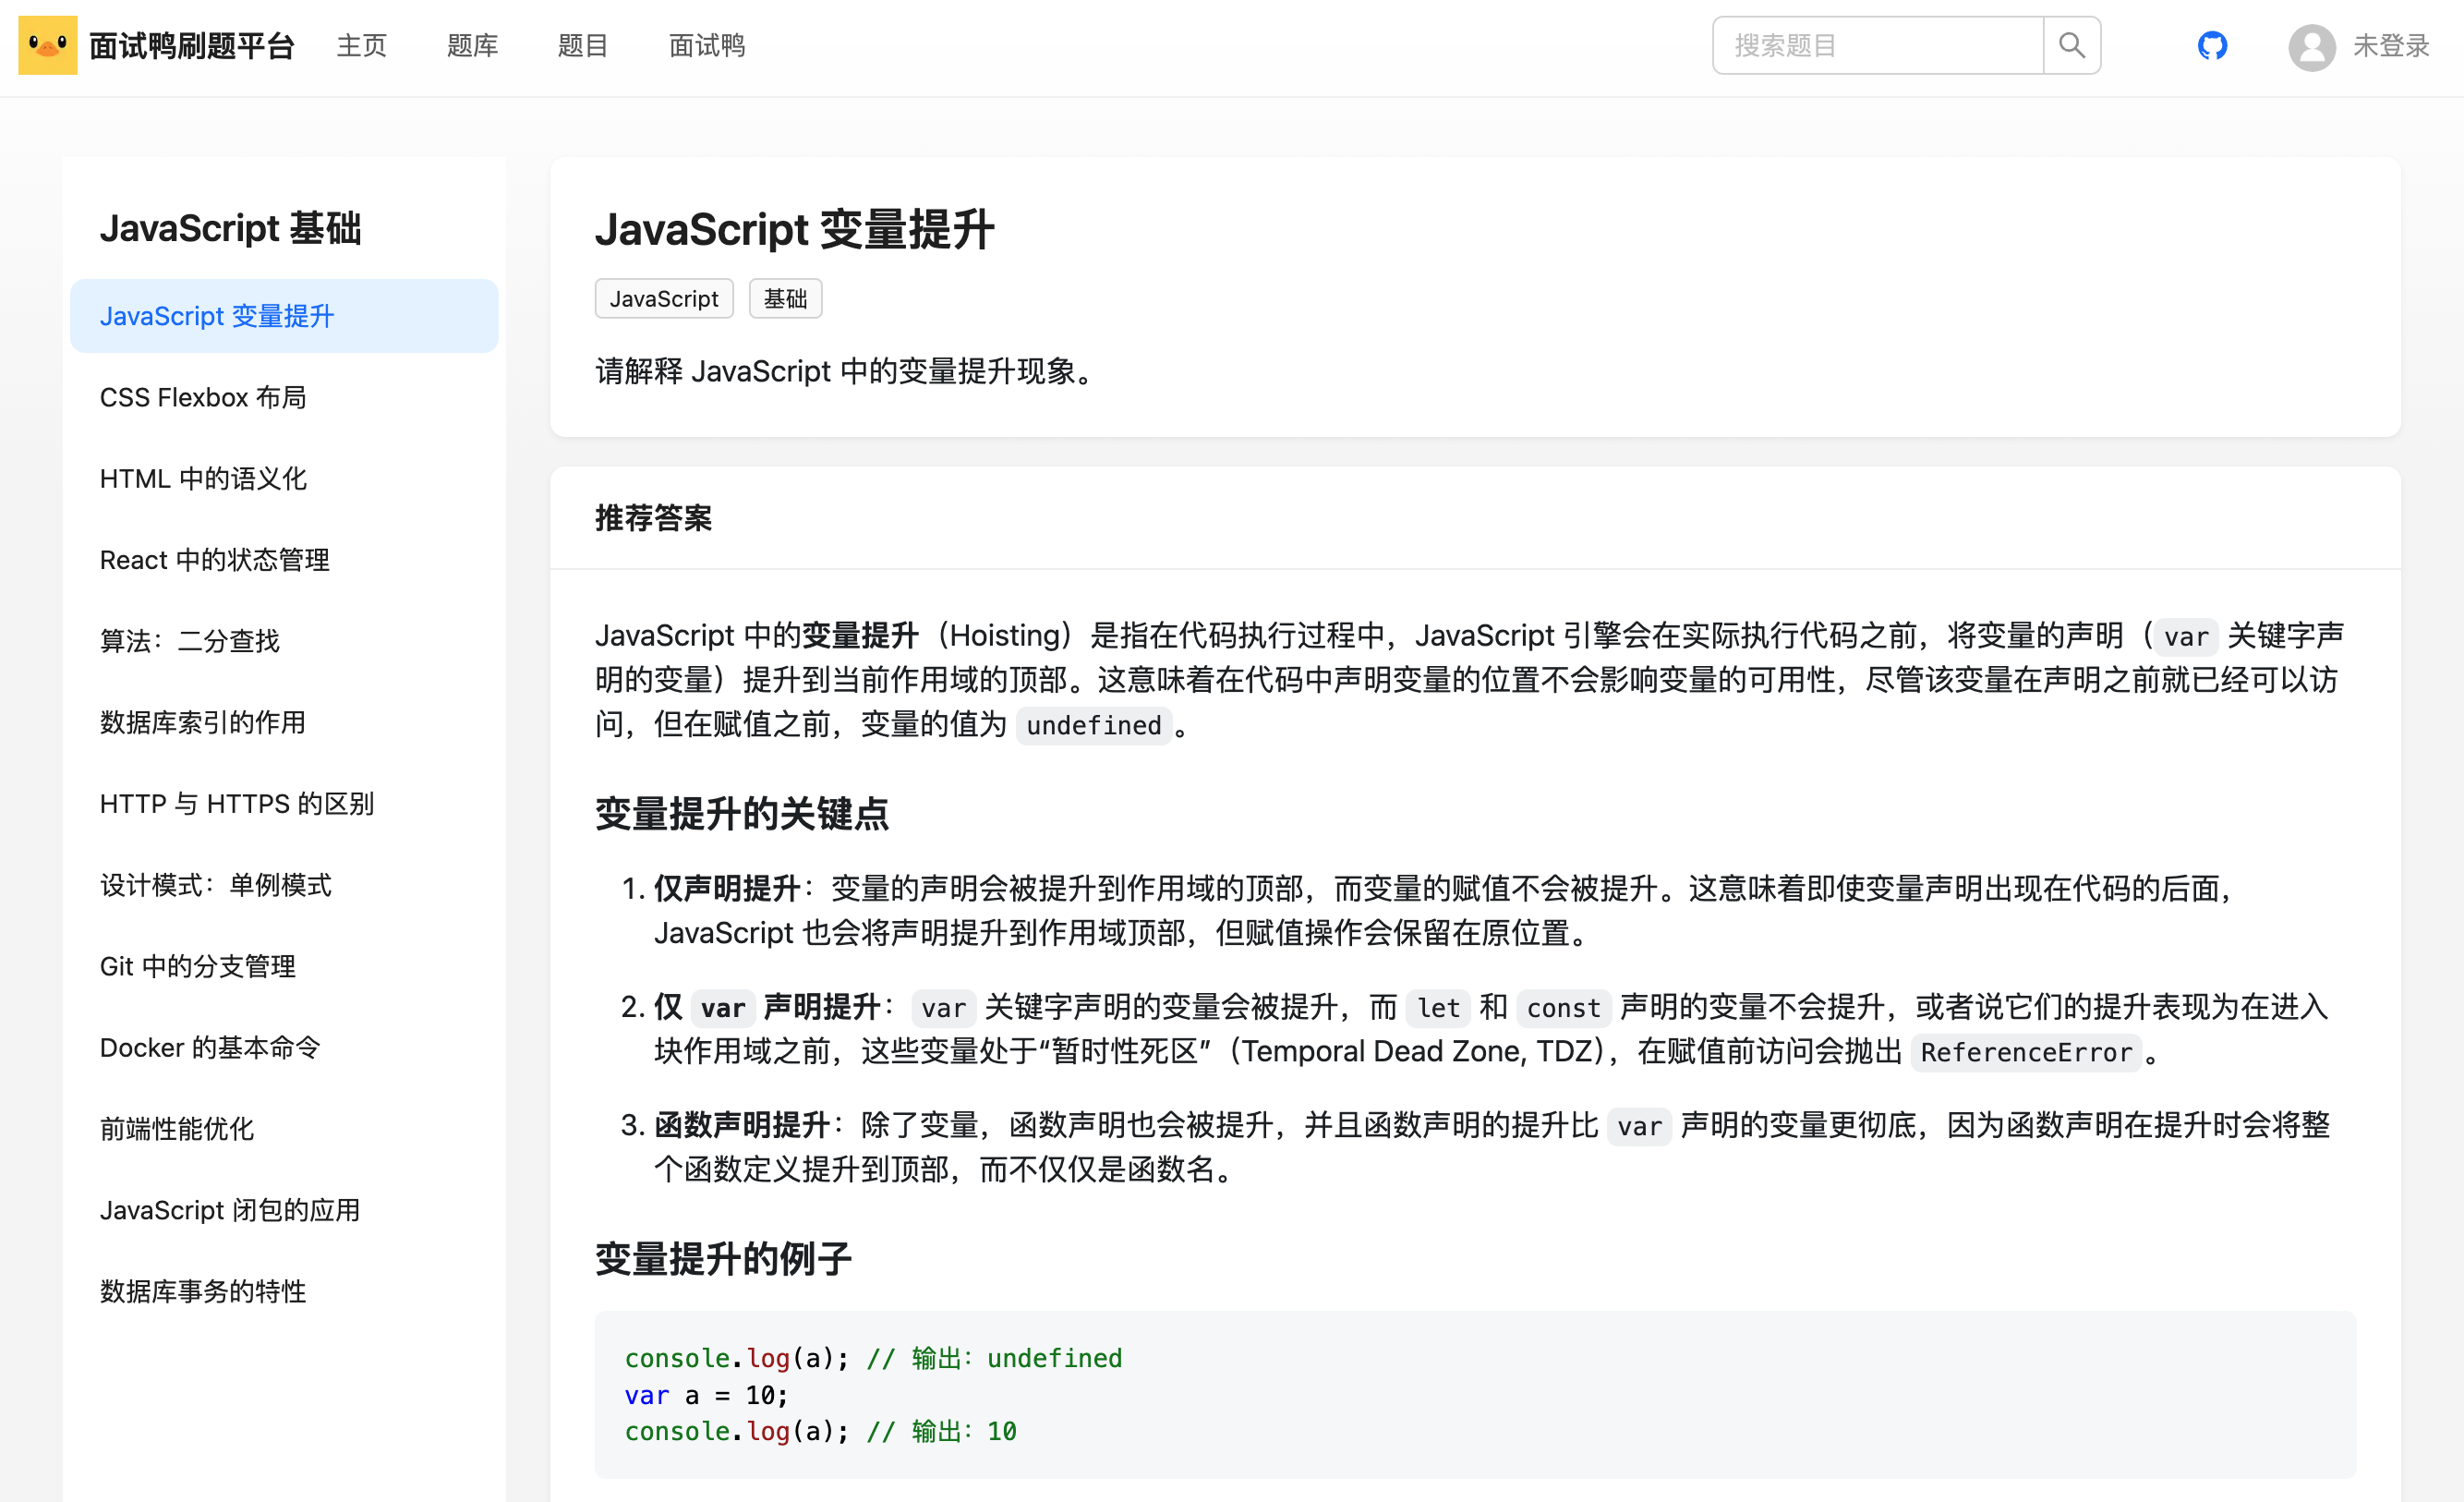
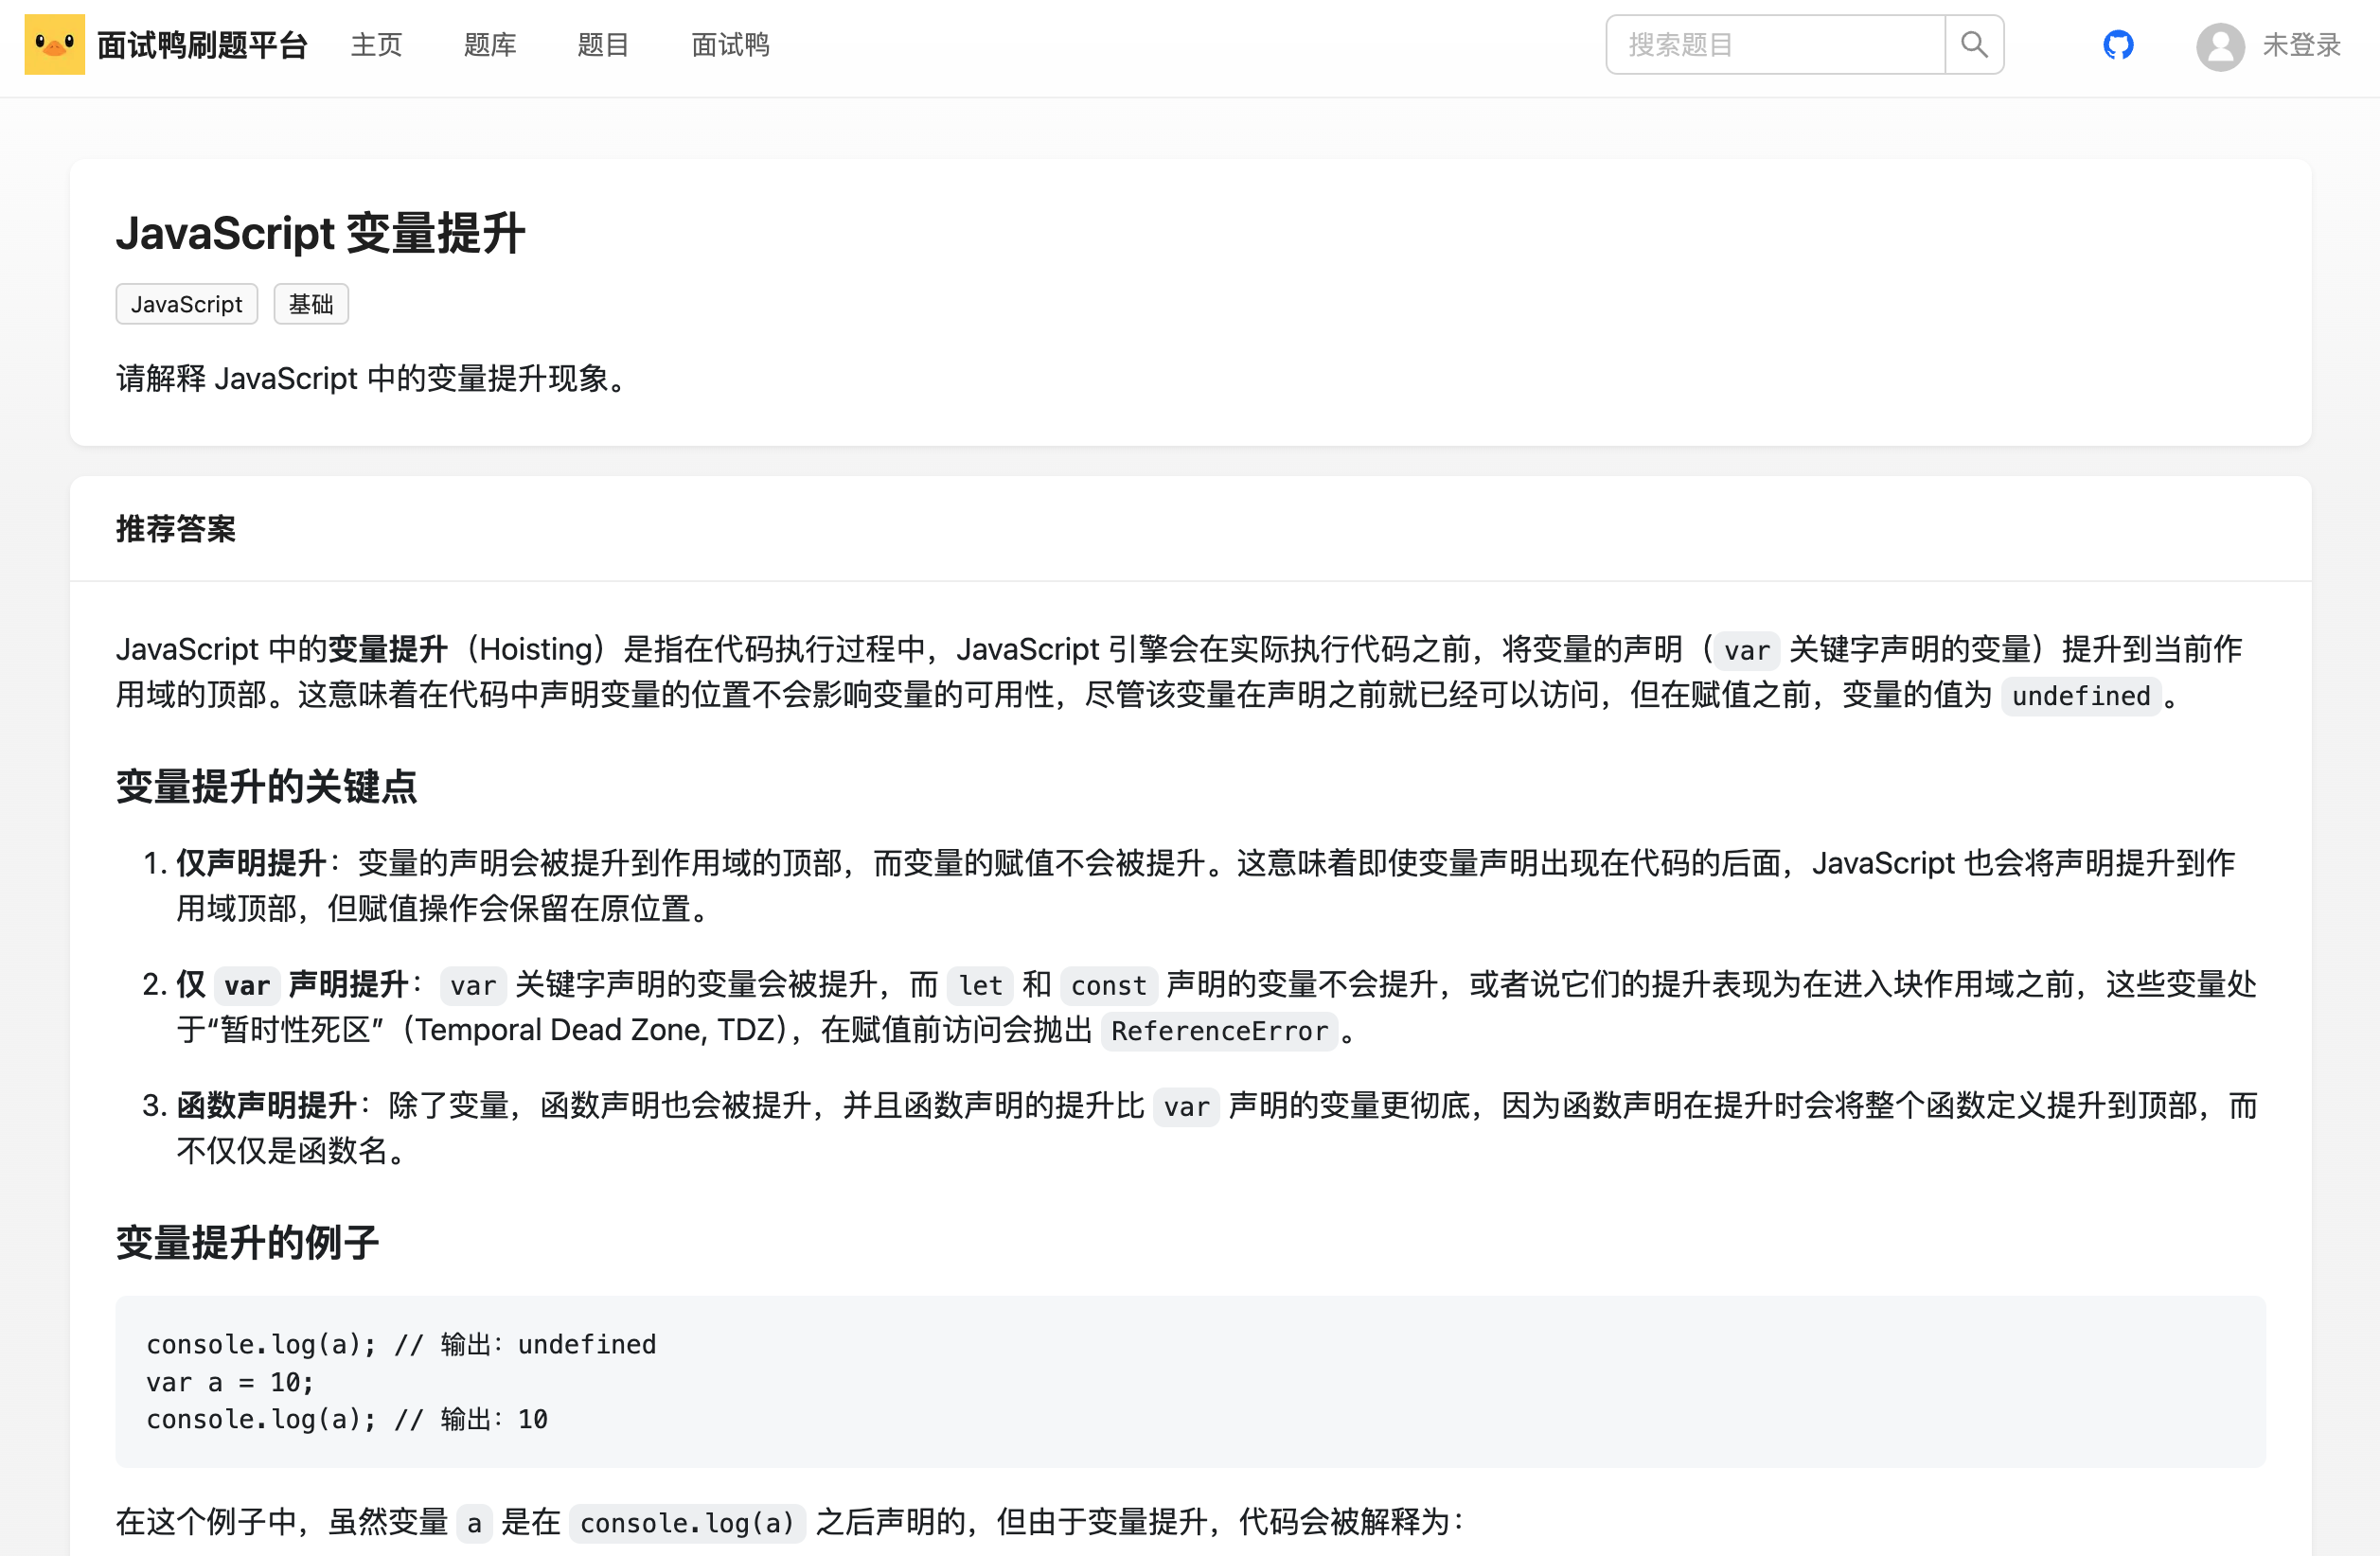
题目详情页
需求:有两种不同的题目详情页
- 从题库进入的题目详情页:左侧需要展示题库内的题目列表。路由:/bank/[bankId]/question/[questionId]
- 从其他位置(比如主页、搜索页)进入的题目详情页,不需要展示题库列表。路由:/question/[questionId]
这两个页面极为相似,可以直接开发额外展示题目列表的题目详情页,另一个页面复制并删减即可。
1、页面整体结构开发
1)选择 Flex 一行两列布局,左边 Sider 侧边栏展示题目列表、右边 Content 展示内容,可以 参考官方文档 实现布局。
1 | <div id="bankQuestionPage"> |
2)从 url 中获取题库 id 和题目 id,然后请求详情数据:
1 | export default async function BankQuestionPage({ params }) { |
接下来就可以依次实现左侧菜单和右侧内容的展示了。1633846519943716865_0.03113562160247385
2、题目列表菜单
菜单需要支持点击和高亮,可以使用 Ant Design 的 Menu 组件,参考 官方文档。
首先获取题目菜单列表,将题目列表数据转为 Menu 接受的数据格式即可:
1 | // 题目菜单列表 |
然后传递给 Menu 组件:
1 | <Menu items={questionMenuItemList} /> |
3、题目详情组件
由于两种题目详情页都需要展示题目详情,所以封装为独立组件。
从上到下展示题目信息即可,注意展示题目内容和答案时使用 MdViewer 组件,代码如下:
1 | "use client"; |
4、切换和高亮题目
点击菜单时,需要切换题目,给菜单组件增加超链接即可:
1 | // 题目菜单列表 |
还需要在菜单中高亮当前题目,可以通过 Menu 组件的 selectedKeys 属性实现选中高亮。根据 questionId 进行匹配,代码如下:
1 | <Menu items={questionMenuItemList} selectedKeys={[questionId]} /> |
5、优化 MdViewer 展示效果
目前编辑器的展示效果不佳,可以参考 ByteMD 组件的指引,下载第三方主题,比如 GitHub 的主题:https://github.com/sindresorhus/github-markdown-css
参考上方文档安装之后,在 MdViewer 和 MdEditor 中引入样式文件:
1 | import 'github-markdown-css/github-markdown-light.css'; |
效果如图:
直接把开发好的 question 目录复制到 app 目录下,删除菜单栏和题库获取逻辑,即可得到单个题目详情页,代码如下:
1 | import { getQuestionBankVoByIdUsingGet } from "@/api/questionBankController"; |
效果如图:
扩展
1)支持折叠题目列表菜单:Ant Design 的 Menu 组件支持自定义菜单折叠触发器,参考文档。
2)题库和题目详情页的右侧可以展示目录、内容推荐等
3)题目详情页可以增加上一题、下一题的跳转
三、题目题库绑定
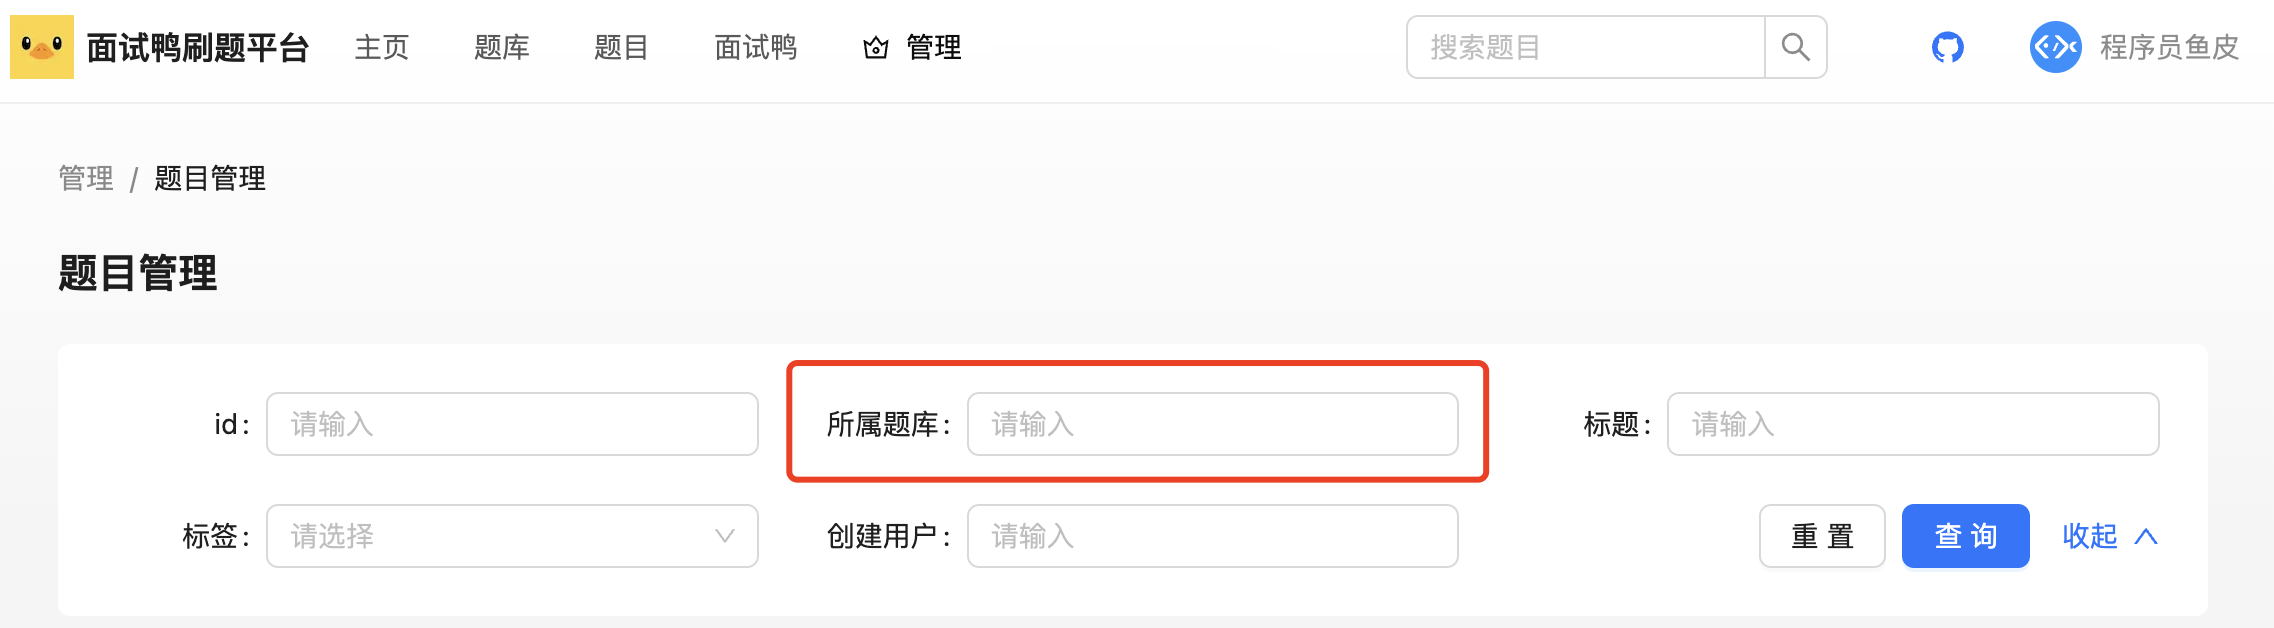
业务流程:直接复用已有的题目管理页面,管理员可以在该页面查询题目列表(比如根据题库查询),然后对这些题目进行操作,比如修改题目所属题库(添加或移除题目题库绑定关系)。
按照题库查询题目
在题目管理页面的 columns 中新增字段,要求表格中不可见,仅用于表单查询:
1 | { |
效果如图:
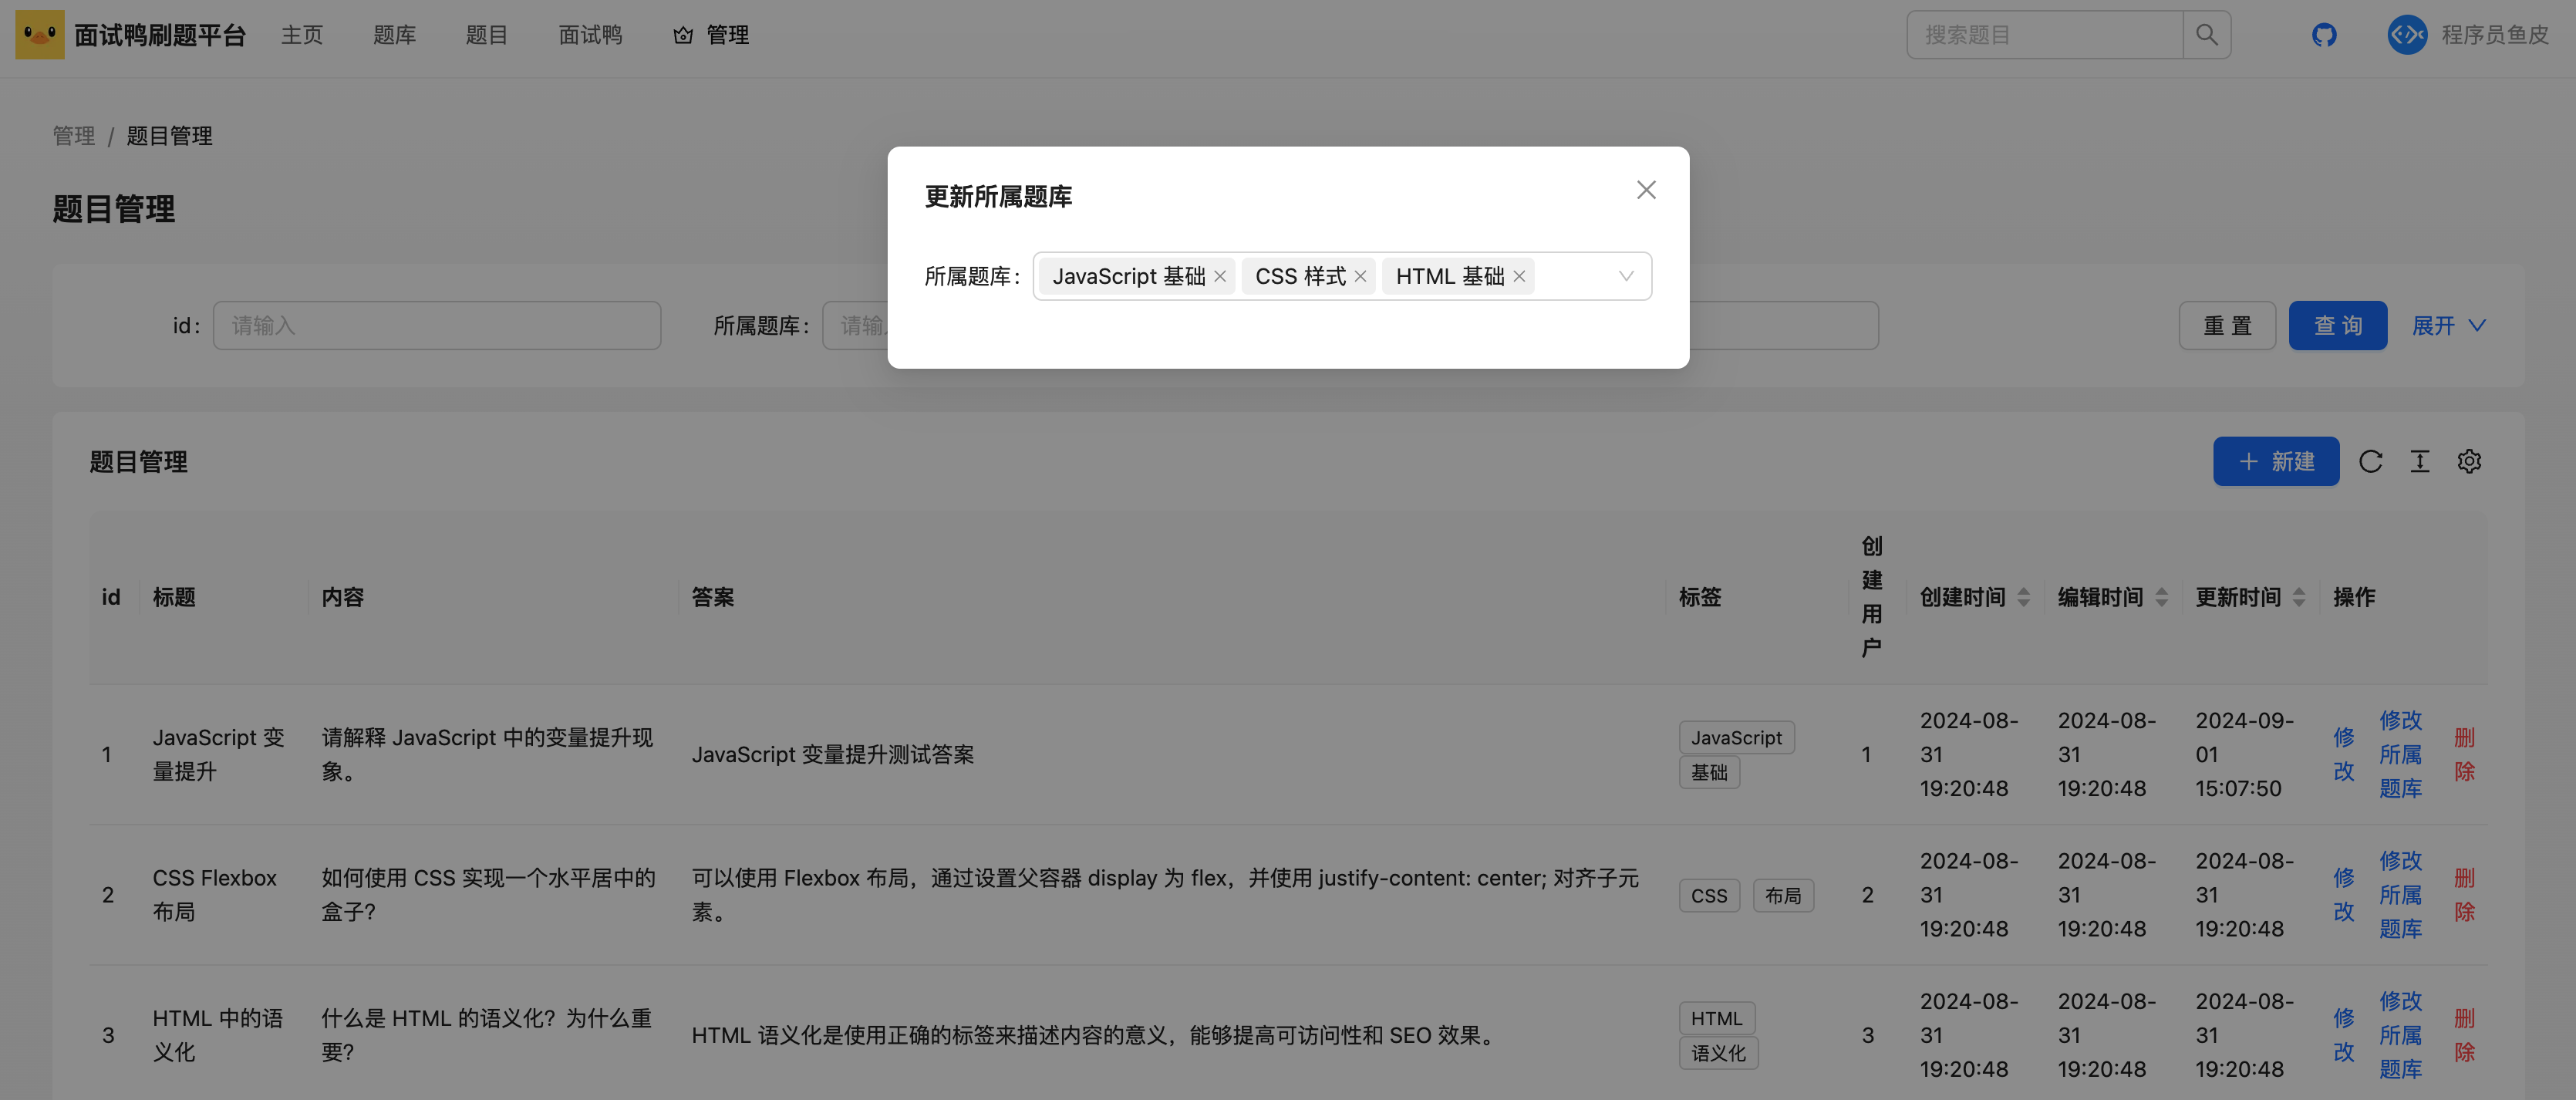
修改题目所属题库
可以参考修改题目信息的做法,在题目管理页面的目录下,新增一个弹窗表单组件。
1、修改题库弹窗组件
直接复制题目修改弹窗组件,在此基础上进行修改即可。
应该如何让用户添加或移除题目绑定的题库呢?可以使用 Ant Design 的 Select 多选组件,来从题库列表中选择题库。选中时调用加入题库接口,取消选中时调用从题库移除接口。
💡 还有其他的实现方式,比如多选所属题库列表后,点击提交按钮,才提交到后端,由后端计算应该如何处理题库题目绑定关系。
组件属性如下:
1 | interface Props { |
表单代码如下:
1 | <Form style={{ marginTop: 24 }}> |
2、使用弹窗组件
1)在题目管理页面新增 visible 变量,用于控制弹窗是否显示:
1 | // 是否显示更新所属题库的弹窗 |
2)新增操作按钮,触发打开弹窗:
1 | <Typography.Link |
3)引入弹窗组件,并传递属性:
1 | <UpdateBankModal |
3、填充默认值 - 获取所属题库列表
如果题目已有所属题库,应该在修改表单中展示。
可以通过获取题库题目关系接口,获取到当前题目所属的题库列表,仅需获取一次,然后填充到表单中作为初始值。代码如下:
1 | const [form] = Form.useForm(); |
给表单组件添加 form 引用:
1 | <Form form={form} style={{ marginTop: 24 }}> |
4、获取可选题库
题库很多,不可能让管理员手动输入 id 来选题库,应该显示可选题库列表和题库名称,提高选择效率。
由于题库数量不多,直接全量获取到题库列表即可:
1 | const [questionBankList, setQuestionBankList] = useState< |
然后计算出 Select 组件需要的选项:
1 | <Select |
5、选中或取消选中题库
利用 Select 的选中和取消选中事件,调用接口实现题库绑定 / 解绑:
1 | onSelect={async (value) => { |
效果如图:
扩展
1)支持在题库管理页面直接搜索和添加题目到题库中,实现方式和上面类似。
2)题库数量较多时,可以根据用户的输入进行防抖搜索,而不是全量将题库列表加载到可选项。可参考 官方文档。
四、扩展思路
以下内容前端同学全都可写到简历上:
1、预渲染
通过 官方文档 了解 Next.js 的 prefetch 预渲染机制,进行性能优化。
比如页面内的链接过多时,预渲染次数会很多,可以将 prefetch 关闭来减少预渲染:
1 | <Link href={`/question/${question.id}`} prefetch={false}>{question.title}</Link> |
2、Metadata
Next.js 支持通过 Metadata 设置页面的 TDK(标题、描述、关键词)等网页元信息。可参考官方文档:https://nextjs.org/docs/app/building-your-application/optimizing/metadata
1 | import type { Metadata } from 'next' |
3、请求缓存
Next.js 扩展了原生的 fetch,支持请求数据的服务端缓存,是提升性能、减少资源占用的好方法。
可以参考官方获取数据的文档:https://nextjs.org/docs/app/building-your-application/data-fetching
但是,我们项目中使用的 Axios 库是不支持缓存的!有其他的方式来实现缓存:
1)可以在 getStaticProps 或 getServerSideProps 中使用 Axios 来获取数据,然后通过 Next.js 的 revalidate 选项来控制页面或数据的重新生成时间。
参考代码如下:
1 | export async function getStaticProps() { |
2)切换其他请求库,比如原生的 fetch,或者官方推荐的请求库:https://swr.vercel.app/zh-CN
4、并发请求
如果同一个页面要多次请求后端,串行可能会很慢,导致页面迟迟不返回。因此可以并发调用多个接口来获取数据,使用 promise.all 语法即可。